Reel is a kind of short video launched by Instagram. It has all of the features that TikTok videos have and allows users to watch these videos within 2 minutes. Similarly, it allows you to post your videos on Instagram Reel by observing the rules that Instagram makes. If you are a host of a channel, you need to take advantage of its rules so that you can get more viewers and followers. How to show more and more useful information in a Reel within 2 minutes is the key to success. Making a Reel with multiple photos is a good way to achieve this purpose. This article will tell you how to make a Reel with multiple photos.

- Part 1. Create a Reel with Multiple Photos via Instagram
- Part 2. Create a Reel with Multiple Photos via TunesKit AceMovi

- FAQ
Part 1. Create a Reel with Multiple Photos via Instagram
Reel as a feature on Instagram, making Reels within Instagram is the quickest way. You can upload the Reel directly when you complete the Reel. But it also has its shorts. For example, if you want to adjust the transition of the Reel and add more than one music to your Reel, Instagram cannot help you do that. Moreover, Instagram just allows you to add 10 photos to a Reel. Of course, if you just need simple editing features, Instagram is a good choice.
How to make a Reel with multiple photos on Instagram
Step 1. Open the Instagram app on your phone;
Step 2. Click the + icon at the center of the homepage; choose the REEL part;

Step 3. Swipe up to see all of the photos in your Photos app;
Step 4. Click the icon next to the “Green Screen” words to choose more than one photo; the order you choose them is the original order of your photos in your Reel; you can change the order in the next steps; click the Next button to continue it;

Step 5. You can change the duration of each photo by dragging and dropping the edge of the video at the bottom of the screen at this step; click the Add button to complete the duration adjustment of each photo until backing to the recording screen;

Step 6. Click the Preview button to see how your Reel goes;
Step 7. Click the icon at the top of the screen, you can add music, effects, stickers and other elements to the Reel;

Step 8. Click the Edit Clip words to reorder or delete certain photos; you just need to drag each photo to reorder them and then click the Done button; click the photo you don’t want to click the Delete button to delete it; when you do all this step, click the Done button to share the Reel to your Instagram channel.
Part 2. Create a Reel with Multiple Photos via TunesKit AceMovi
TunesKit AceMovi gives you an overall video editing feature that makes up for Instagram shorts. It has various transitions that help you reduce the sense of connection, creative text styles that enrich your Reel, and split screens that designs your Reel.
About its basic editing features, AceMovi gives users the most convenient ways to use it. Cropping, splitting, speeding up and slowing down, and reversing videos just need one click. Within AceMovi, you can add more than one song to your Reel and don’t have the limitation on the number of the photo. AceMovi is suitable for all video making, but if you want to make a Reel, you should make sure your video is less than 90 seconds according to the rule of Instagram Reel. This method is useful on how to make a Reel with multiple videos and photos.

TunesKit AceMovi Video Editor
Security Verified. 5,481,347 people have downloaded it.
- Basic and advanced features that make your video better
- Multiple filters, transitions, text, sound effects, music
- User-friendly interface
- Import as many photos or footage as you want
- Make Instagram Reels in just a few steps
How to make a Reel with multiple photos via TunesKit AceMovi
Download and install software
Click the Free Download button above or visit the official website to download AceMovi on your computer, Mac or Windows;
Import photos
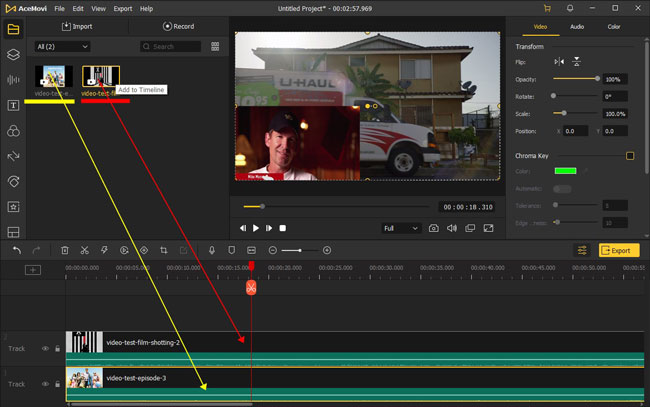
Open the software and then click the Import button to import the photos you need to the Media panel;
Add photos to the timeline
Drag and drop each photo to the timeline at the bottom of the editing screen;
Edit photos
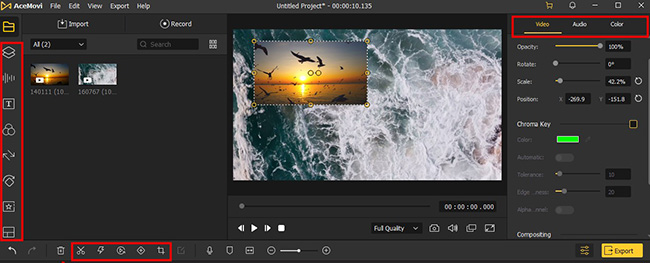
Click the Elements, Audio, Effects, Transitions, Animations, and Split Screen icons at the left of the editing screen respectively, you can add stickers, background music or sound effects, transitions, animations, and split screen to your photos within the Reel;
Above the timeline, there are Split, Speed, Reverse and Crop icons; you can use the Speed icon to adjust the duration of each photos so that you can make sure the length of the Reel is less than 90 seconds;
Preview the Reel
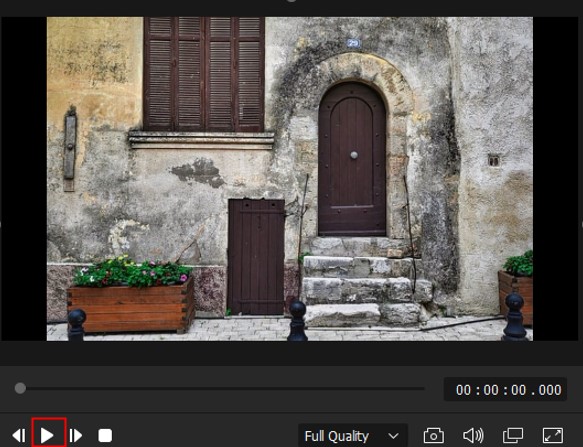
Click the Play icon below the preview window to preview the Reel you made;
Export the Reel
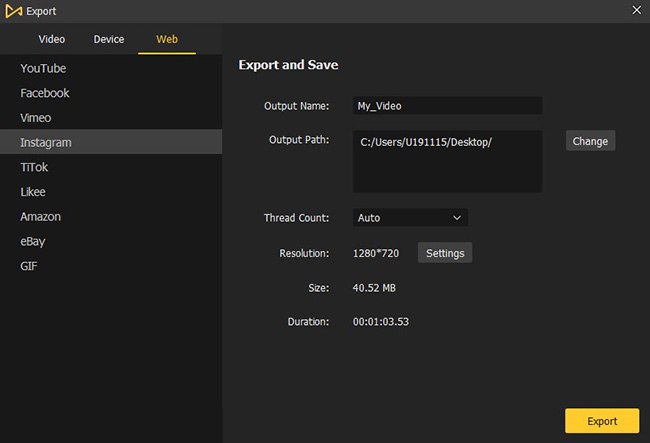
Click the Export button to open the Export window; at the left of it, you can choose the format of the Reel; here you can click the Web > Instagram options to choose the format compatible with Instagram directly;
At the left of the window, you can change the name of the Reel and choose the location of it on your computer; click the Export icon to save it to your computer.
FAQ
1. Can an Instagram Reel be 3 minutes?
Instagram Reels video length are 15 seconds to 90 seconds.
2. How many photos can you put in an Instagram slideshow?
10 photos. If you want to add more than 10 pictures, you can try to use TunesKit AceMovi to make your slideshow.
3. What is the main difference between a Story and a Reel?
The biggest difference between Instagram Reels and Story is that Reels are public. Stories can be seen only by your followers or someone who views your public profile while Reels are viewable by all Instagram users.
Conclusion
A Reel with multiple photos shows a continuous story for viewers. After you learn how to make a Reel with multiple photos, you can design your story by yourself just with several photos. You can try Instagram to do it and then judge if it is enough for you. If not, TunesKit AceMovi may be the best helper for you to make a unique and beautiful Reel for your Instagram channel. Hope you can have a good experience.

