

Since sound films were shown, audio or voice has become an indispensable part of a video. In a video, there is more than one audio track so that it can work perfectly with the video footage. But if we want to make audio and video footage exist harmoniously, we need to adjust the audio. One of the ways to adjust audio is to fade out or fade in it for a video. Adobe Premiere Pro is a good helper to do this job. This post brings three effective methods to tell you how to make audio fade out in Premiere Pro. If you want to know how, please keep reading.
- Part 1. What are Fade In and Fade Out in Premiere Pro?
- Part 2. How to Make Audio Fade Out in Premiere Pro in Three Ways
- Part 3. Premiere Pro Alternative to Fade Out Audio - TunesKit AceMovi
Part 1. What are Fade In and Fade Out in Premiere Pro?
For audio, fading in means that the audio you select will get louder until it reaches its normal volume. This effect is usually used at the beginning of a video. As for fading out audio, it means that the volume of the audio you choose will get lower until there is no volume. In contrast, the fading out effect is usually used at the end of a video. But these common practice is just a reference for you. Only it is adaptable, you can use them anywhere.
Part 2. How to Make Audio Fade Out in Premiere Pro in Three Ways
There are three useful methods for you to fade out audio in Premiere Pro. They are Audio Transitions, Pen Tool, and Auto Ducking.
Method 1. Fade Out Audio in Premiere Pro via Audio Transitions
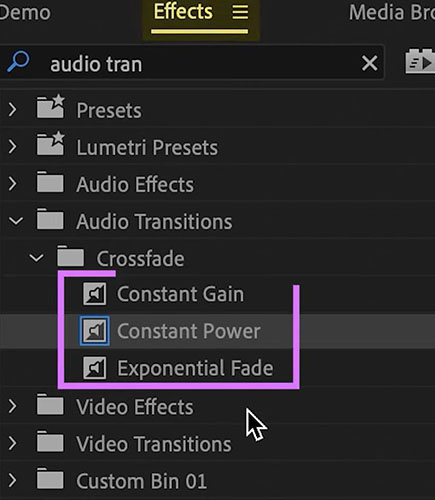
Using audio transitions is the easiest and the most convenient way to make audio fade out in Premiere Pro. Premiere Pro provides users with three types of audio transitions: constant gain, constant power, and exponential fade.
Constant gain
Audio using constant gain crossfade will fade out abruptly and affect the feelings of viewers. This transition is not recommended for users.
Constant power
Constant power creates a quieter transition between one audio clip and another. You can feel that the audio gets lower obviously but not abruptly. Viewers will be more comfortable with this transition.
Exponential fade
This type of crossfade is more stable than the other two audio transitions. It begins by adjusting an audio clip’s volume slowly up or down, increasing in speed at a set rate until the end. Its stability makes it popular in video editors.
Steps to use audio transitions to fade out audio in Premiere Pro
Step 1: Add your video and audio to the timeline in Premiere Pro;
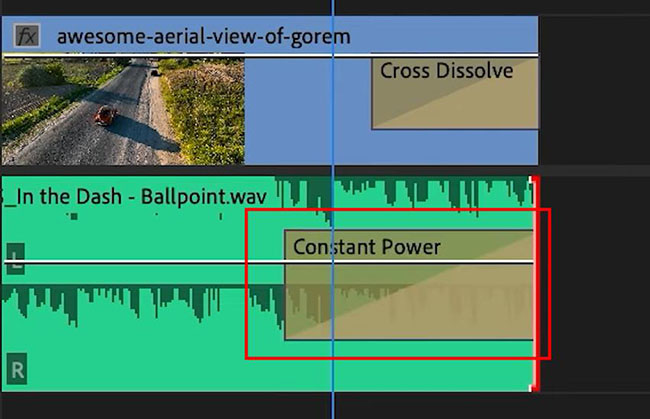
Step 2: Click the audio on the timeline and then reach the Effects Panel; if you cannot see the panel, you can navigate it through Window > Effects to enable it; Within the panel, choose the Audio Transitions option and then select the transition you want and then drag and drop it onto the beginning or end of the audio clip on the timeline;
Step 3: Adjust the duration of the transition by dragging and dropping the edge of the transition.
Method 2. Fade Out Audio in Premiere Pro via Pen Tool
This way is more freewheeling than the first way. Using Pen Tool to fade out audio needs you to adjust the mode on how to fade out audio in Premiere Pro. That means that you can design a new frequency of fading out audio.
Step 1: Add your audio and video to the timeline;
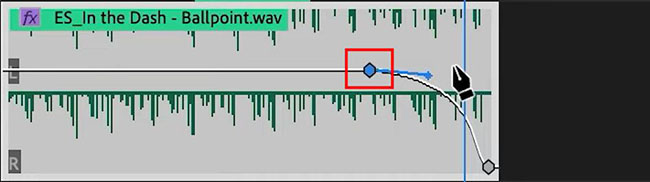
Step 2: Click the wrench-like icon to turn on the Show Audio Keyframes; after that, you can see a white line on the audio timeline;
Step 3: Press P on your keyboard to bring up the pen tool and click the place that you want to begin fading out and that you want to end with two keyframes.
Step 4: Drag down the second keyframe according to the strength of fading out as you desire;

If you want to fade out smoother, you can drag the first keyframe to make the line a curve so that the audio will not fade out too abruptly.
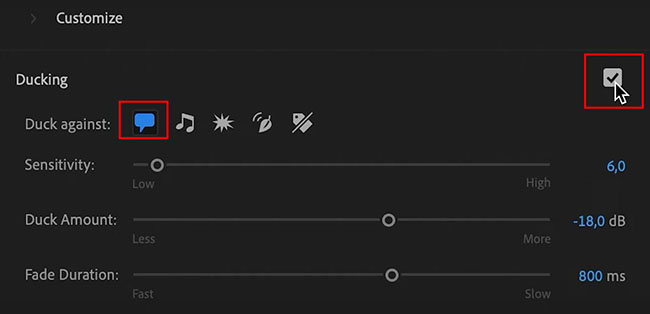
Method 3. Fade Out Audio in Premiere Pro via Auto Ducking
This method is used for those videos with more than one audio track, which can make specific audio stand out and weaken specific audio. For example, there is a video with a voiceover and background music, but we cannot listen to the voiceover clearly. Now we need to fade the background music.
Step 1: Add audio and video to the timeline;
Step 2: Select the voiceover clip and then find the Essential Sound panel to click the Dialogue > Auto-Match button; scroll down to reach the Clip Volume part to turn up the volume of the voiceover;
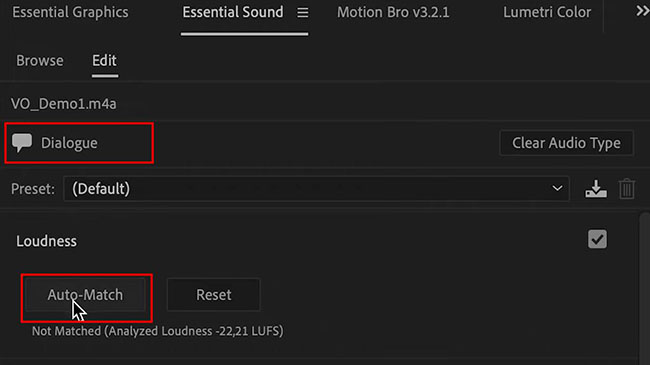
Step 3: Now go back to the timeline and click the music track and then click the Music > Ducking; on the ducking options, you need to choose the chat icon to make the background music ducked in a way. Now you can find that the voiceover is more clear than before.
Part 3. Premiere Pro Alternative to Fade Out Audio - TunesKit AceMovi
Although Premiere Pro is an excellent video editor, it is too complicated to use for some of people. Therefore, here we recommend a simple but easy-to-use video editor, which is TunesKit AceMovi.
TunesKit AceMovi is a useful video editor allowing users to make all kinds of videos by themselves. It also has the audio fade-out and fade-in features. In AceMovi, you just need to adjust the progress bars of fading out and fading in.

TunesKit AceMovi Video Editor
Security Verified. 5,481,347 people have downloaded it.
- Advanced Color Correction tools and algorithms
- Basic and advanced features that make your video better
- Multiple filters, transitions, text, sound effects, music
- User-friendly interface
- Import as many photos or footage as you want
How to make audio fade out via TunesKit AceMovi
Download and install software
Click the above download button to download AceMovi to your Mac or Windows;
Import files and add them to the timeline
Drag and drop your videos and audio from your computer files to AceMovi; and then Drag and drop it to the timeline;
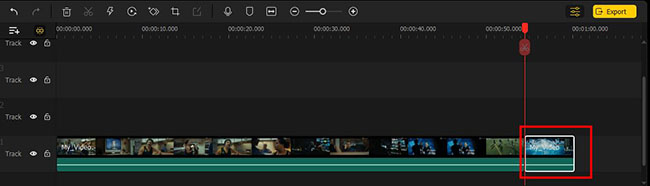
Choose an audio clip to fade out
Select the audio on the timeline and then split out the audio clip you want to fade out with the split tool above the timeline;
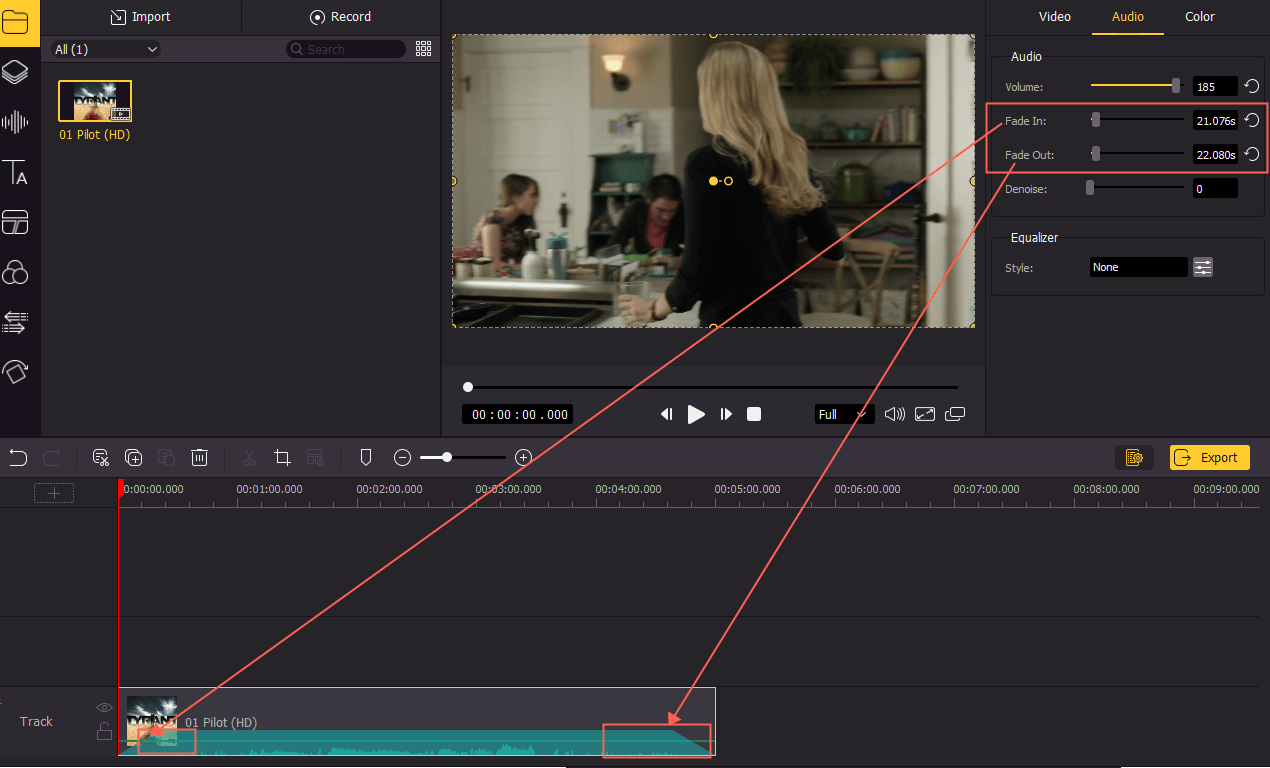
Fade out audio
Click the audio clip you just chose and then click the Audio panel on the left of the preview window to adjust the level of fading out.
Export video
Click the Export icon to save the video on your computer; you can even choose your video’s format.
Conclusion
Until now, we have learned three effective ways on how to make audio fade out in Premiere Pro. Each of them can achieve the task perfectly according to your thought. If you are not familiar with Premiere Pro, you can try to use TunesKit AceMovi to do this job, which is also a good way. Hope you can get a satisfactory work.