Audio sync and balance play a very very important role in the process of video post-production. Most video makers won’t be satisfied with the original audio quality as it’s mixed with a lot of background noises and uneven inputting TRK (Sound Track). In this case, you can choose to dub the video in the recording studio or add a voice-over with a video editing tool. Whichever, you need to learn how to detach audio from video as well as how to pick up a proper video editor.
I must say that you’re in the right place! Dig in this post where you’ll learn the easiest tutorials with some recommended fantastic audio editing tools. Let's get started!
- How to Detach Audio from Video on Mac & Windows 10
- How to Extract Audio from Video Online
- How to Remove Audio from Video on iPhone & Android
- Detach Audio from Video in Davinci Resolve/Premiere Pro/iMovie
- Lastly
TunesKit AceMovi - A Brilliant Video Editor to Detach/Extract Audio from Video on PC
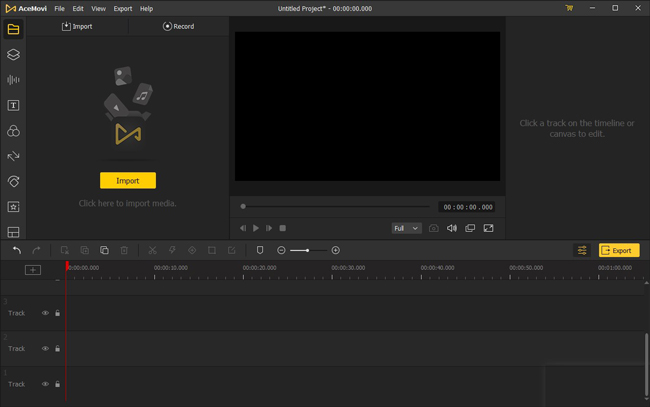
When you want to find a video editor to detach audio from video, TunesKit AceMovi must be one of the best options in the video editing market. Overall, TunesKit AceMovi is a beginner-friendly & beautiful toolkit that compiles a set of audio sync and balance features to edit audio on a computer such as Sound Equalizer, Pitch, Volume, Fade-In & Out Effect, Denoiser, etc.
Apart from audio extraction, with AceMovi, users can also select from 200+ background music resources and sound effects. For example, you can bleep a video with the Beep effect in one click or insert the background music of classic, pop, countryside, jazz, piano, loop, and so on.
Besides, all of the basic functions to edit video like Trimmer, Cropper, Reverser, Converter, Compressor, and Recorder are built-in. Here just click the downloading button to get TunesKit AceMovi’s trial version for completely free even without any purchase-ins.

TunesKit AceMovi Video Editor
Security Verified. 7,367,112 people have downloaded it.
- Features with a plethora of free sound resources
- Edit audio/video after detaching directly
- Add a voice-over to videos in one click
- Very cheap license price to remove watermark
- Advanced techs including split-screen, PiP, reversing, Chroma Keying, etc.
- Export at MP4, MKV, MOV, AVI, MPG, WMV, and more in HD quality
Pros:
- Cannot process text-to-speech tech right now
Cons:
How to Detach Audio from Video with TunesKit AceMovi
Download, Install, and Run AceMovi
Do any video edits with this video editor? Download and install it first! For free on the trial version!
Import Video Clips
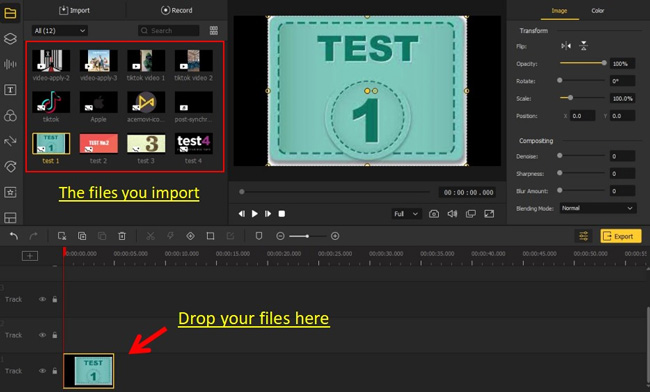
You don’t need to worry about whether the format will be processed, just drag-&-drop all the video, audio, and image files you want to edit.
Commence Detaching/Removing Audio from a Video
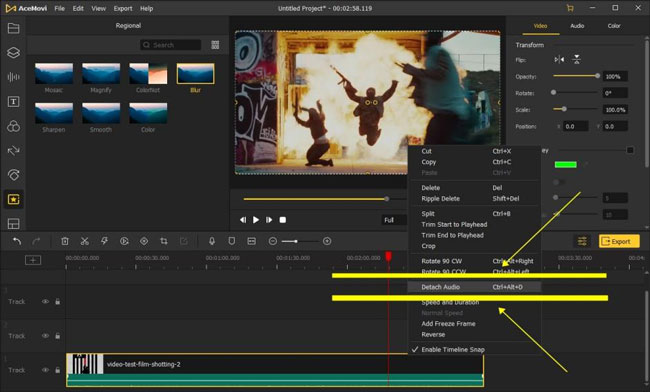
★ Shortcut to detach audio from video in AceMovi: Ctrl+Alt+D
On AceMovi’s interface, right-click the video track then press the Detach Audio option.
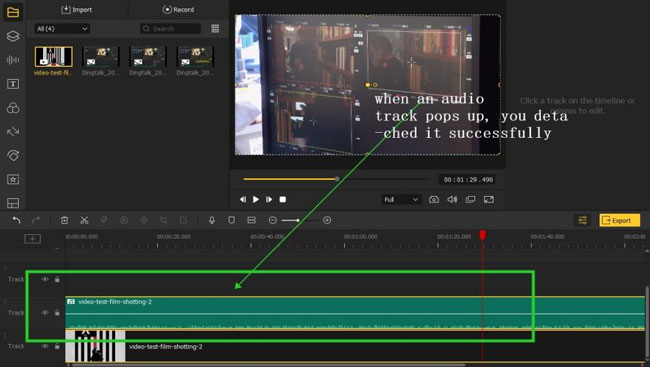
In this case, the detached audio will be moved into the next track, if you don’t want to use it, you can directly delete it.
Add a Dub to Video or Record a Voice-Over
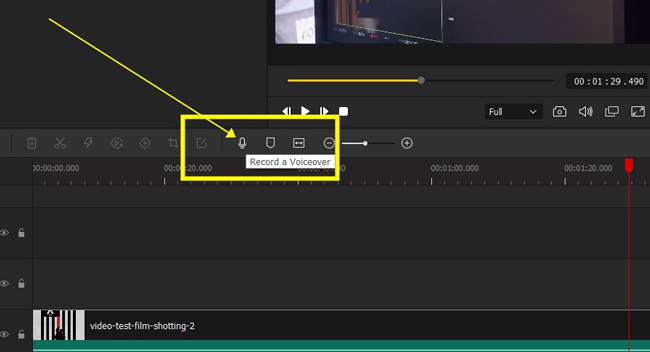
If you want to add a post dub in the video, you can drop the dub file under a new track. And go to the Properties to adjust the duration.
Want to record a voice-over with AceMovi? Find the toolbar and click the microphone icon. Then you’ll go to AceMovi Recorder with which you can record Realtek(R) Audio or system audio. And the recordings will be automatically saved in the Media panel.
Export the New-Made Video
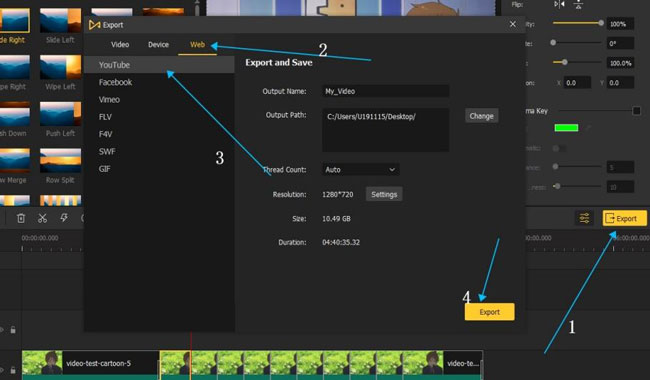
Time to showcase your content. Press the Export icon to choose the wanted format. If you detached a YouTube video and now are planning it to upload in on your account, go to Web > YouTube, you’ll the video downloaded with 0.264 Codec, 16:9 aspect ratio, and 1920*1080 resolution. Come on to try more exporting options!
Kapwing - A Free Video Editor to Detach Audio from Video Online
Want to detach audio from videos online without any software downloads? Here I recommend you to try the Kapwing online video editor. You can even import videos by the URL of YouTube, Instagram, TikTok, and many more social media and then share the edited video with the URL again.
However, with online audio and video editor, you may encounter unstable internet and lags. So to edit multiple videos or audios, better work on software. With Kapwing, you’re free to download video at 480p max, and higher quality needs a license. Now, let’s see how to use it to detach audio from video online.
Import Videos by Drag-n-Drop or URL
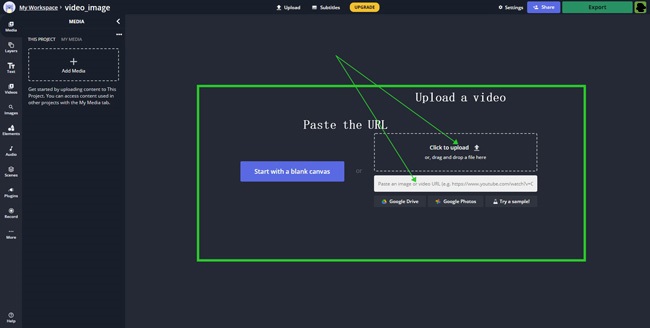
To begin with Kapwing online video editor, you can: (1) Drag-n-drop files; (2) Copy-n-paste videos’ URL; (3) Choose a video template.
Begin to Detach Audio from Video Online
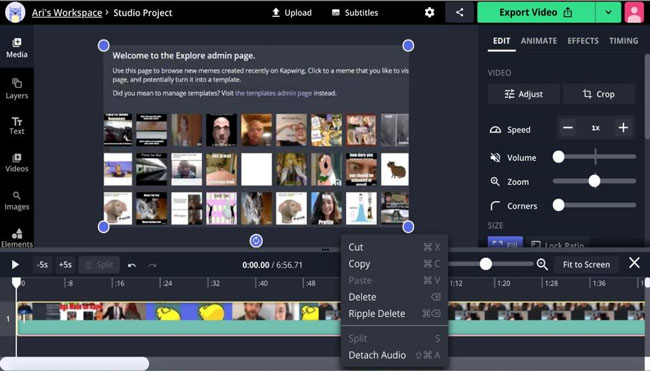
Go to Kawping’s timeline to right-click the video and choose the Detach Audio line. Later, you can add your dub or directly edit the detached audio track.
Download or Share Video
Very well! Now click the Export icon to download your video. If you want to export the video to HD, you need to buy the full license.
VN - A Watermark-Free Video Editor App to Detach Audio from a Video on iPhone & Android
Planning to edit audio on your mobile? Here is the recommended app - VN video editor. VN’s user-friendly interactive interface, quick upload materials, and robust editing effects make your editing more efficient. It’s a streamlined video editing app without watermarks yet is not a social sharing app so you cannot deem it as TikTok and Instagram.
Both Apple Store and Google Play have VN to download for free. You can begin with a new recording by the phone camera after authorizing it or a new uploading from the local album. Here is the tutorial on how to detach audio from video on iPhone or Android with VN!
Import Files
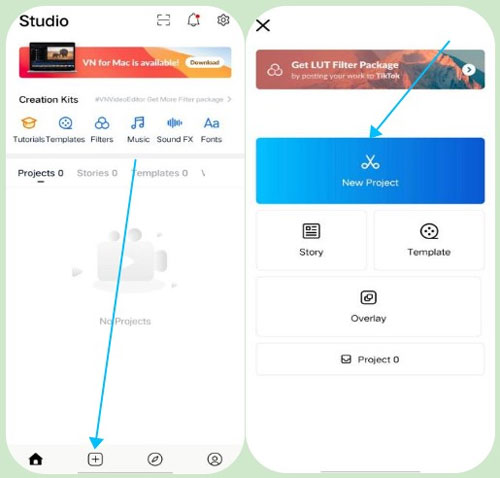
When getting into VN, click the + icon to begin. You can choose the New Project to select files from local or press the Story, Template, and Overlay to discover more.
Start to Extract Audio from Video on Mobile
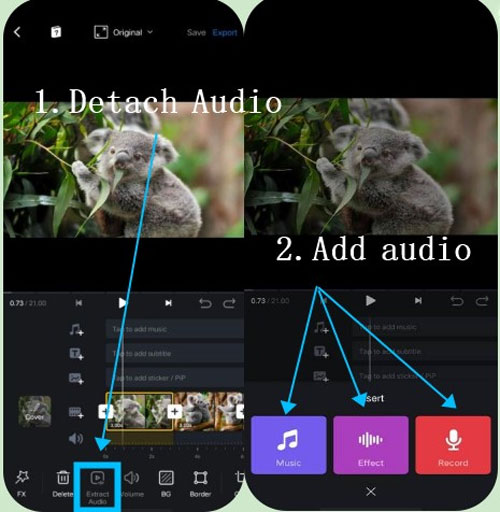
Now, slide the toolbar to choose the Extract Audio. You can delete the audio track as well. If you want to add new audio and effect or record, click the Music track.
Download or Share Your Video
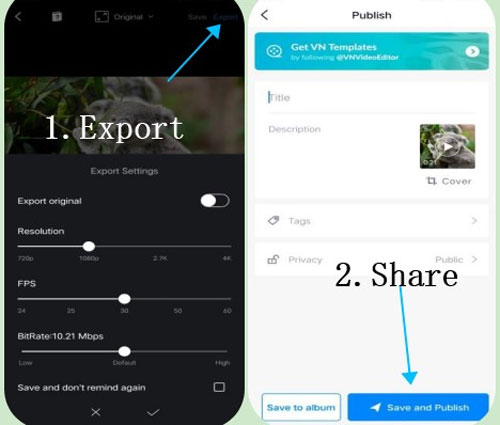
The download icon is set in the upper right corner. By clicking on it, you can choose to set output resolution, FPS, Mbps, etc. On the next page, you can click Save to Album to download to your phone or click Save and Publish to download and share it on YouTube or Facebook.
More Audio Detaching Editors - Detach Audio from Video in Davinci Resolve/Premiere/Filmora/iMovie
How to detach audio from video in Davinci Resolve 16/17? In Premiere Pro? Filmora? Or iMovie? In this section, I’ll show you how to make it with those video editors in a couple of clicks. Keep reading!
1. Davinci Resolve
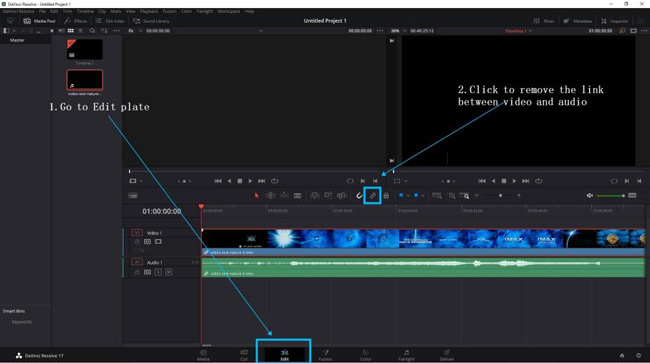
★ Shortcut to link/unlink audio and video in Davinci Resolve: Ctrl+Shift+L
Davinci Resolve is an open-source and pro video editor for PC users, you can download it free on both Mac and Windows 10. One of the biggest selling points of this product is the watermark-free export service. Davinci Resolve is now updated to version 17 and includes the specialized plates of Media, Cut, Edit, Fusion, Color, Fairlight, and Deliver. If you want to detach (unlink) audio from video in Davinci Resolve, you need to go to the Edit plate. Let’s see the step-by-step guide!
Step 1. Import Videos: Drop the files under the Media place or go to File > Import > Media;
Step 2. Detach Audio from Video: Move your eyes to the bottom functions to choose the Edit. Now press the clip first, then press the Link/Unlink icon on the toolbar;
Step 3. Export Videos: Go to Media > Export to set the downloading parameters like resolution, aspect ratio, codec, etc.
2. Adobe Premiere Pro
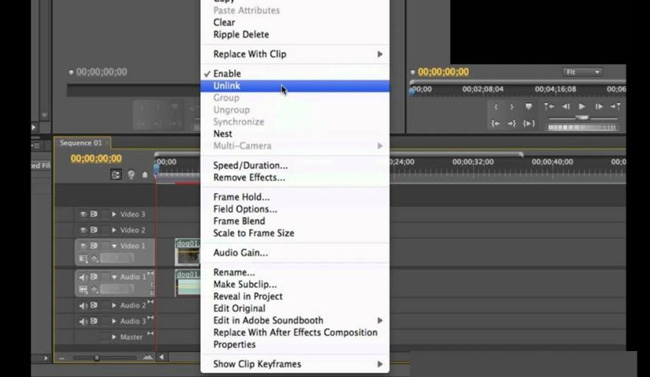
Premiere Pro is a professional & fully-featured video and audio editing tool. You can download it on Mac or Windows 10, 11. It can even process and edit 8K videos so you’d better use a high-standard computer to launch it. Same as Davinci Resolve, Premiere Pro will separate imported videos into a video clip and an audio clip but they are linked as a whole. Now, let’s go to the tutorials on how to extract audio from video in Premiere Pro.
Step 1. Import Clips: You can drag-n-drop the files under the timeline or click taps of Import;
Step 2. Extract Audio from Video: Right-click the clip to choose the Unlink option. Reversely, if you want to link the audio and video, press it again;
Step 3. Export Video: Go to File > Export > Export Local. Here you can also choose to share the video on social websites like YouTube and Facebook.
3. Wondershare Filmora X
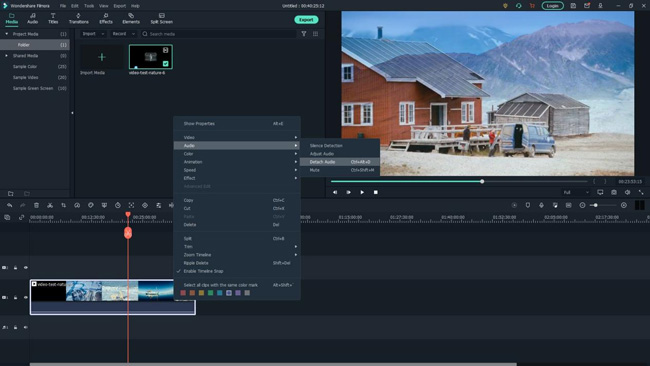
★ Shortcut to detach audio from video in Filmora X: Ctrl+Alt+D
Wondershare Filmora X is an all-in-one video editor that comes with a bunch of small edits as well as advanced features. This tool updates quickly and now you can enjoy plugins like Auto Reframe, Auto Highlight, PC Screen, etc. On the pre-interface, click the New Project to begin. Here are the steps of how to detach audio from video in Filmora X.
Step 1. Import Video: Find the Media plate and click the + icon to upload files from local folders, or do the file dropping simply;
Step 2. Detach Audio from Video in Filmora X: To do this, you need to right-click the imported video and choose the Audio > Detach Audio;
Step 3. Export Video: The Export icon is set beside the Media place. If you press it, Filmora will advise you to buy its full license of removing the watermark or you can ignore it to export with a brand watermark.
4. iMovie
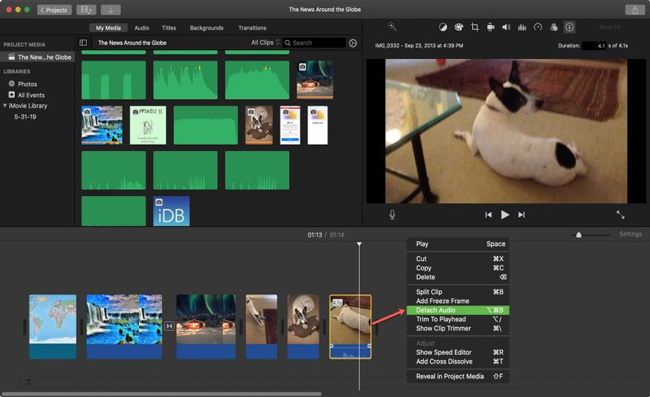
iMovie is a completely free & easy-to-use video editor yet for iOS and macOS only. So you can try the tutorials of removing audio from video on your iPhone or iPad as well. iMovie comes with a library of elements like transitions, filters, images, sound effects, and so on. Here is the guide.
Step 1. Import File: Drag-n-drop is supported in iMovie. Or you can click the My Media to import files;
Step 2. Remove Audio from Video: Right-click the wanted video and choose the Detach Audio option;
Step 3. Export Video: Move your eyes to the right upper place and you’ll find the downloading presets of video and audio. This video editor won’t pint watermark on your exports.
Lastly
You may discover two different types of detaching/extracting audio from video, the one is choosing the Detach Audio option, another is Link/Unlink the audio and video. It lies in the reason that those video editors that apply the latter type will separate the audio track when you import video clip at the very beginning. Got better ways? Appreciated to see your opinions!

