Final Cut Pro is a professional video non-linear editing software launched by Apple in 1999. This powerful video editor is designed for Mac users which means that you can only use Final Cut Pro on your Mac. If you are a fan of Mac and with a Mac at the same time, this video editor may be one of the best choices to create your videos and process your work because it includes everything you need for post-production. As one of the most important factors for video design, aspect ratio will decide the direct feeling of audience when they watch your videos. This is a tutorial aiming to tell you how to change aspect ratio in Final Cut Pro. If you are not sure how to do it, this post will give you a hand.
- Part 1. What is Aspect Ratio in Video Editing?
- Part 2. How to Change Aspect Ratio in Final Cut Pro
- Part 3. Best Final Cut Pro Alternative for Aspect Ratio- TunesKit AceMovi
- Part 4. Prevalent Aspect Ratio
Part 1. What is Aspect Ratio in Video Editing?
Aspect ratio in video editing refers to the proportional relationship between the width and height of a video frame. It is represented as two numbers separated by colons, such as 4:3 or 16:9. The first number means the width of the video, and the second number means the height of the video.
In video editing, it is crucial to maintain a consistent aspect ratio. If the aspect ratio changes during the video, it can cause black bars to appear on the sides or top and bottom of the frame, or even cause the video to be stretched or squeezed, which can distract the viewer and appear unprofessional. Therefore, video editors need to decide on the right aspect ratio based on the target platform and audience before starting the editing process.
Part 2. How to Change Aspect Ratio in Final Cut Pro
Step 1: Open the Final Cut Pro software on your Mac and then click the File option at the top of the software to import your video; you can drag it directly; click the Inspector icon above the preview window to open the Inspector panel;
Step 2: Add the video file to the timeline;
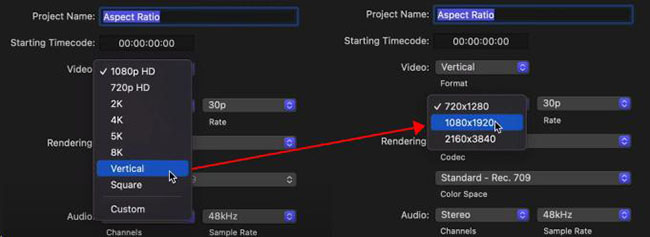
Step 3: Click the video name on the Tutorials panel and then turn to the Inspector panel to click the Modify button; you can see a pop-up;

Step 4: Click the arrow next to the Video words to choose the format of your video; and then the resolution arrow to confirm the aspect ratio of your video; in Final Cut Pro, aspect ratio and resolution are set at the same time; you can also customize aspect ratio by choosing the Custom option and then input the number you want;
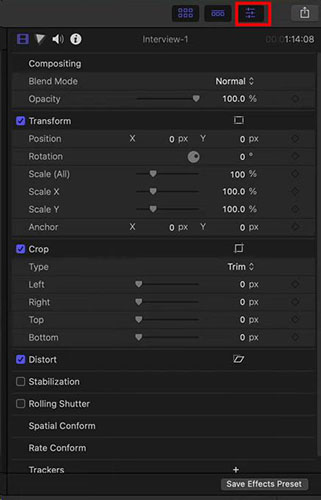
Step 5: Click the video on the timeline and then adjust your video to fit the aspect ratio you just chose on the Inspector pnanel.
Note: Many people think that resolution and aspect ratio are the same. But in fact, they have different concepts. Resolution refers to the number of pixels on your videos and it decides the clarity of your videos while aspect ratio refers to the proportional relationship between the width and height of a video frame. Two videos with the same resolution, 1920 X 1080, may have different aspect ratio, 16:9 or 9:16.
Part 3. Best Final Cut Pro Alternative for Aspect Ratio- TunesKit AceMovi
If you don’t have a Mac, how can you change video aspect ratio? To deal with this solution, we prepared another powerful video editor compatible with both Windows and Mac PC. The name of this video editor is TunesKit AceMovi, which also allows you to change your video aspect ratio easily and quickly.
TunesKit AceMovi is an easy-to-use video editor with an intuitive interface. Different from Final Cut Pro, AceMovi gives you several preset aspect ratios. You can select the corresponding aspect ratio directly for your video suitable for your destination platform.

TunesKit AceMovi Video Editor
Security Verified. 5,481,347 people have downloaded it.
- Advanced Color Correction tools and algorithms
- Basic and advanced features that make your video better
- Multiple filters, transitions, text, sound effects, music
- User-friendly interface
- Import as many photos or footage as you want
How to change video aspect ratio via TunesKit AceMovi
Download and install
Download TunesKit AceMovi on your computer and install it;
Import a video
Click the Import button to import your video to the AceMovi Media panel and then click the + icon to add it to the timeline;
Change aspect ratio
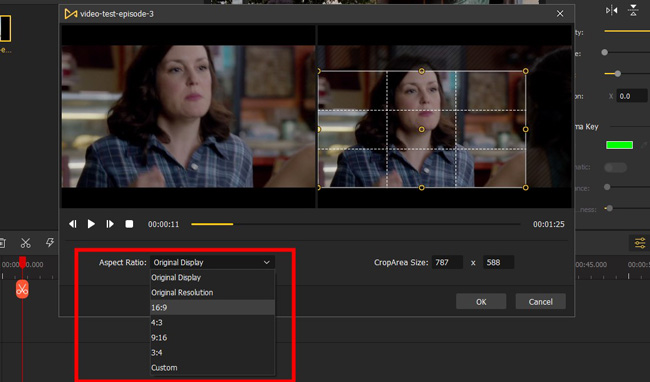
Click the Crop icon above the timeline; on the pop-up, you can click the Aspect Ratio arrow to choose the aspect ratio you want; you can also adjust aspect ratio manually;
Export videos
Click the Export button to choose your video output format; at the Web part, you can even choose the corresponding video formats for different social media; click the Export button again to save it to your computer.
Part 4. Prevalent Aspect Ratio
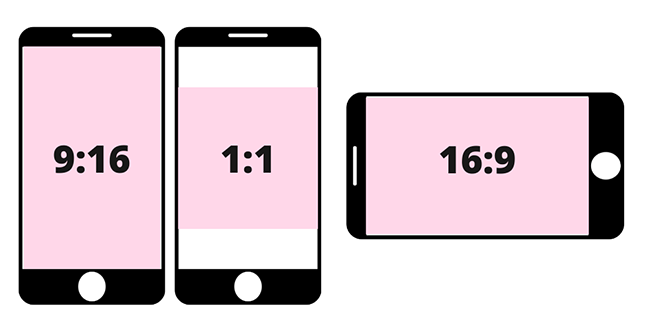
9: 16
Undoubtedly, this video aspect ratio is one of the most popular video aspect ratios around the world. You can find that this aspect ratio is used on many social media such as Facebook, Instagram Stories, and TikTok. This vertical shape is so popular mainly because we can watch it on our phones conveniently.
16: 9
For traditional TV and some online platforms like YouTube, 16: 9 is the standard aspect ratio which is also considered the international standard for HDTV and non-HD digital television. Most social media support this aspect ratio.
1:1
It is a square shape if a video or an image has this aspect ratio, which means that the width and height of the video are equal. You can see it on Instagram.
Conclusion
It is not a difficult task to change aspect ratio in Final Cut Pro. The key point to make your video better is to select the right aspect for your video and a good video editor gives you the way to achieve it. If you have a Windows PC, TunesKit AceMovi is the better choice for you. Hope you can get your desired video.

