

Animation is an attractive technique when we make a video with numerous frames. When those frames move, we will feel moving images, also called animations. In this article, we will talk about one of the animation techniques, keyframe. If you are a video editing lover, you would be familiar with this technique. However, different video editors have different ways to use it. CapCut is a popular video editor with a useful keyframe technique. Here we focus on how to add keyframes in CapCut on PC to give you some help in using keyframes in video editors.
- Part 1. What is Keyframe?
- Part 2. How to Add Keyframes in CapCut on PC
- Part 3. Bonus: CapCut Alternative to Add Keyframes on PC

Part 1. What is Keyframe?
A keyframe is a crucial concept in animation and video editing that marks a specific point in time where a change occurs. In the context of digital animation and editing, keyframes are used to define the starting and ending points of any smooth transition. By setting keyframes, you can control various properties of an object, such as position, scale, rotation, opacity, and more.
Part 2. How to Add Keyframes in CapCut on PC
CapCut not only allows users to add keyframes to videos but also images, audio, and texts. For videos and images, you can add keyframes to change their position, size, blend, and opacity. For audio, audio volume can be adjusted when you add keyframes to it. For texts, when there are keyframes on it, you can change their color, position, size, blend, and opacity. Now let’s look at methods to add keyframes to videos and images, audio, and texts in CapCut on PC.
1. How to Use Keyframes to Design Videos and Images
Step 1: Upload a video and an image to CapCut and add them to the timeline;
Step 2: click the video track and then drag the playhead to find the beginning of the clip you want to change parameters;
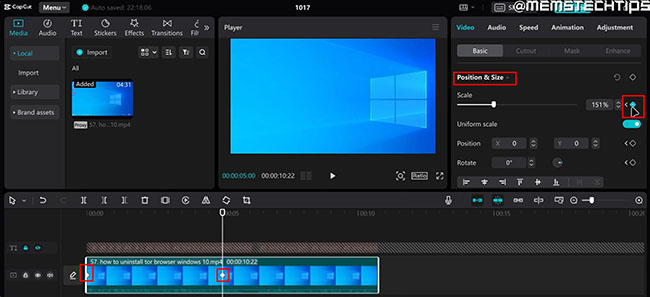
Step 3: Now turn to the video basic panel on the right of the preview window; supposing that you want to change the size and position of one scene in this video, you can click the Add keyframe icon next to the Position & Size to add a keyframe;
Step 4: Drag the playhead again to find the end of the clip you want to change parameters; click the icon again to add another keyframe;
Step 5: After adding two keyframes, you can start adjusting the videos’ size and position by adjusting the parameters on the panel or directly dragging and dropping its edge to change its position and size;
Step 6: Preview the video after adjusting.
The steps to add keyframes to design images are similar to videos only if you choose the audio track on the timeline. By the way, in a video, you can add more than two keyframes. How many you add and how to add are up to you.
2. How to Add Keyframes in CapCut to Design Audio
Step 1: Add audio to CapCut and then add it to the timeline of CapCut;
Step 2: Drag playhead to find the beginning of the audio clip you want to change volume and then turn to the audio basic panel to click the Add keyframe icon next to the Volume text to add the first keyframe to the audio;
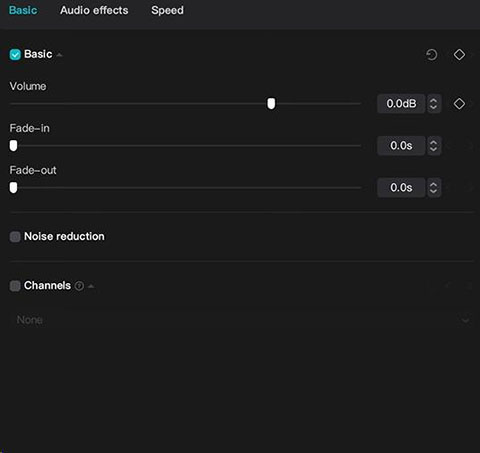
Step 3: Drag playhead to find the end of the audio clip and then click the icon again to add the second keyframe to the audio;
Step 4: Now you can adjust the volume of the audio clip.
3. How to Add Keyframes in CapCut to Design Texts
Step 1: Add the text to CapCut and then add it to the timeline;
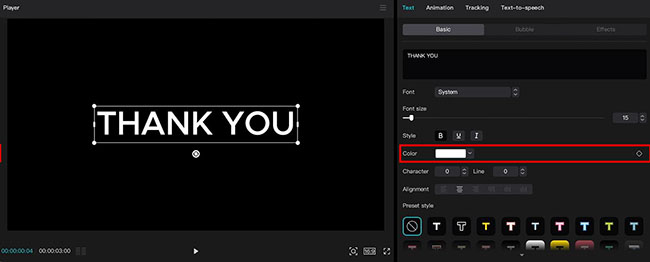
Step 2: Drag playhead to locate the beginning of the text clip that you want to change its parameters; supposing that you want to change text color, you need to click the Add keyframe icon next to the Color text to add a keyframe;
Step 3: Drag playhead to find the end of the text clip and then click the icon again to add the second keyframes to the text track.
Step 4: Now you can change the color of the text clip.
Many parameters can be set. But you need to use the corresponding keyframes if you want to change specific parameters. By the way, if you want to use keyframes to design your videos, images, audio, or texts, you should add at least two keyframes so that you can change parameters successfully.
Part 3. Bonus: CapCut Alternative to Add Keyframes on PC - TunesKit AceMovi
TunesKit AceMovi is also a good PC software to add keyframes to videos, audio, images, and texts. In addition to adding keyframes, AceMovi allows users to edit their videos with its useful and convenient video editing features.

TunesKit AceMovi Video Editor
Security Verified. 5,481,347 people have downloaded it.
- Advanced Color Correction tools and algorithms
- Basic and advanced features that make your video better
- Multiple filters, transitions, text, sound effects, music
- User-friendly interface
- Import as many photos or footage as you want
How to add keyframes on PC via TunesKit AceMovi
Download and install
You can click the above download button to install it on your computer;
Upload files
Drag and drop files to AceMovi and then add them to the timeline;
Add keyframes
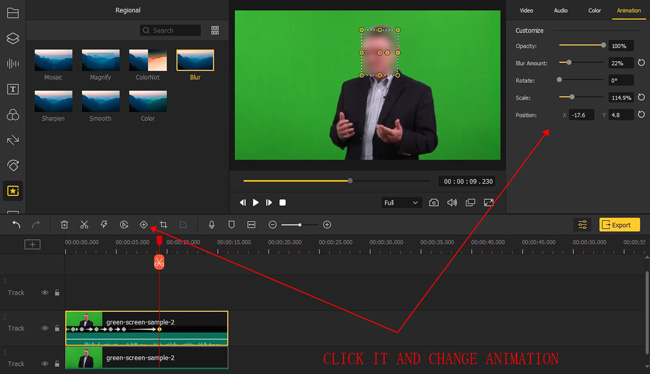
Drag the playhead to find the start point of the video clips and then click the Keyframing icon to add the first keyframe; find the end of the clips and then click the icon again to add the second keyframe; change its parameters on the Animation panel on the right of the preview windows.
Preview and save the video
You can preview the video on the preview window; click the Export icon to save the video to your computer; there are many video formats for you to choose on the export window.
Conclusion
Now you know not only how to add keyframes in CapCut on PC but also how to use another useful video editor, TunesKit AceMovi, to use keyframes to design your works. It is more efficient to practice it in person than just to say. Hope you can get a satisfactory work.