
The sample rate ( or sampling rate) determines how many times per second the sound is encoded. From the technology aspect, it equals the sampling frequency used to make digital capturing. Normally, the widely applied sample rate for soundtracks is 44.1 kilohertz, which generates the standard beat-making for a piece of music and levels up it into HQ. You may find that the conversion to 44.1 and 48 kHz is unlikely to be operated easily. It’s nothing! We will be sharing with you the five strategies to change audio sample rates, along with the intelligent audio-making programs to fuel creativity.
- How to Change Audio Sample Rate with AceMovi [Win/Mac]
- Alternatives to Operate Sample Rate Change in Audio 1. How to Change Audio Sample Rate by AConvert [Online] 2. How to Convert Music into 44.8 kHz with Logic Pro [Mac/iPad/iPhone] 3. How to Burn Audio Sample Rate to HQ/SQ in Premiere Pro [Win/Mac] 4. How to Increase Music Sample Rate via DaVinci Resolve [Win/Mac]
- Conclusion
[AceMovi] How to Change Audio Sample Rate in Windows 10 & Mac

AceMovi operates the workflow of changing audio sample rates convenient and quick because of the user-centered timeline and the trackless toolbar. MP3, OGG, WAV, M4R, AU, ALAC, M4B, AIFF, AAC, and more audio formats are supported. In other words, you can convert audio files to other types of audio files in this software with a couple of clicks.
Many audio effects are offered for you, including but not limited to fading-in/-out, reverse, slow-motion, trimming, merging, ripple deleting, and frame freezing. You can try those built-in tools on the trial version without limits. More importantly, AceMovi is not merely an audio editor, but a robust tool to edit video and photo clips. So, it's accessible to change the audio bitrate from a video.
AceMovi Audio Editor
- The majority of audio formats are included
- All-in-one toolkit for video audio sync and balance
- Hundreds of licensed music & sound effects
- Bleep, Shot, & other 200+ royalty-free audio effects
- Convert batch audio files into 32/44.1.48 kHz
- Detach audio from video to make further editing
How to Change Audio Sample Rate from Video in AceMovi
To import audio files, you can directly drop the files under the timeline of AceMovi. The imported media will become thumbnails in the "Media" plate, you can reedit any one of them later.
Change the Sample Rate of Your Music
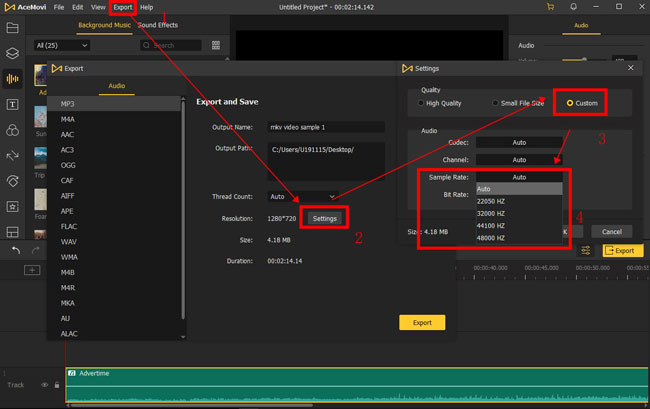
The whole process is very easy. You firstly click go to the "Export" menu and choose the "Export Audio" line. Then click the "Settings", then press the "Custom" icon when you see a new window. In the following dropdowns, you are allowed to change the audio sample rate.
Export Audio File

In fact, the above is the way to export your audio files without delay. But more than that, you can continue to change the output name, output path, format, quality, codec, bitrate, and speed.
Alternatives for Chaging the Audio Sample Rate
Up to now, we've shared with you AceMovi's step-by-step guides to alter the sample rate of the audio file. You also have more alternatives to choose from, they may be advanced or professional, or applied to be used online so that you don't need to download any software or app. Let's see the details.
1. How to Change the Sample Rate of an Audio File with AConvert Online
If you want to know how to change sample rate of audio files on your browser easily, I will recommend the AConvert to you. It's a feature-rich online video and audio editing program embedded with a file converter, cutter, merger, compressor, and many more. It's free so that you won't be asked to pay for the service to remove the watermarks from your exported clips. Here is the guide.
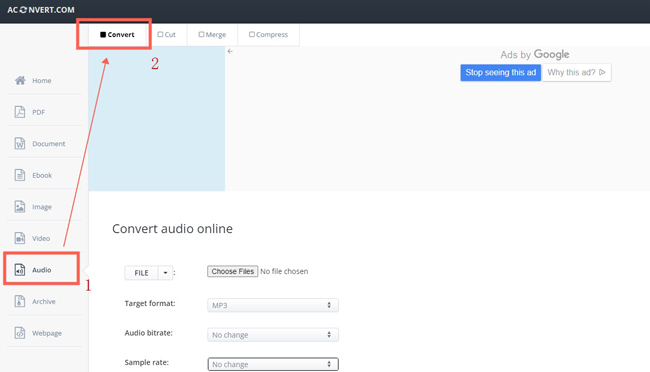
When you enter into the profile of AConvert, just click the "Audio" and "Convert" to launch the built-in audio converter tool, then you'll see the workflow layout.
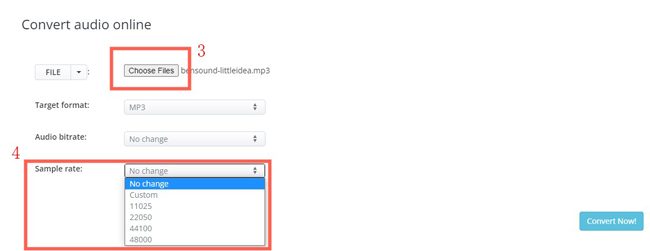
This program allows you to change sample rate up to 48 kHz. To make it possible, you need to upload files first and foremost. You can choose to upload files from the local folder, online URL, Google Drive, or Dropbox. After that, open up the "Sample Rate" dropdown to convert it into the value you want. Lastly, click the "Convert" button.
2. How to Change Sample Rate of Audio File with Logic Pro
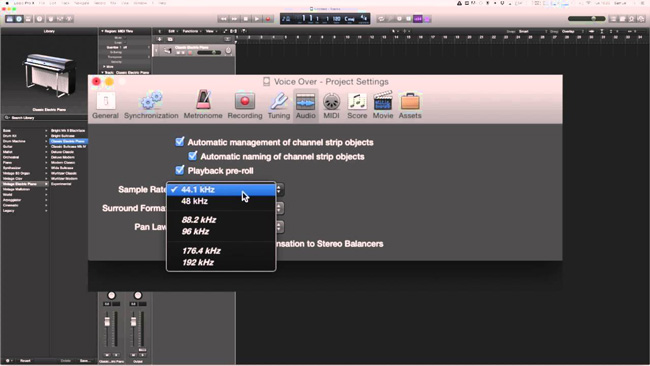
You may be interested in how to change sample rate in pro tools. The Logic Pro is a professional audio editing software for any type of workflow. It contains advanced tools, such as the audio equalizer, surround format converter, pan value changer, recorder, and audio sound waves. You should download this software to enjoy the 7-day free trial or buy it to get the full features.
As for the media importing, you need to drop the files under the interface directly. Then go to the "Voice-over" button to make related settings. For example, you can change the sample rate into prebuilt 44.1, 48, 88.2, 96, 176.4, or 192 kHz, which makes Logic Pro stands out and different from other tools.
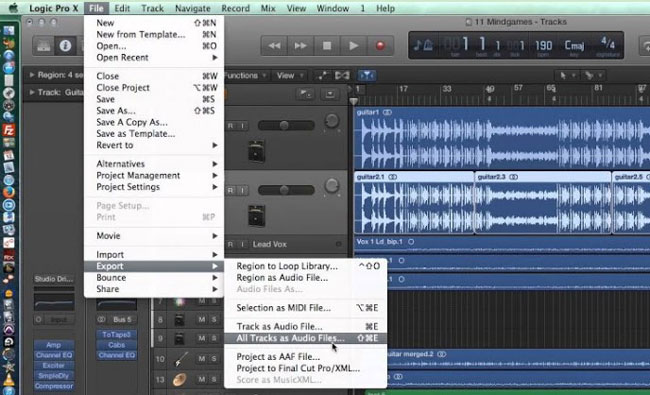
To export all tracks as audio files, the process is clicking the "File" and "Export", alternatively, it's available to drop your files under the timeline without a hitch. Many more presets are included, including codec, speed, ripple, beats, and format.
3. How to Change Audio Sample Rate in Premiere Pro
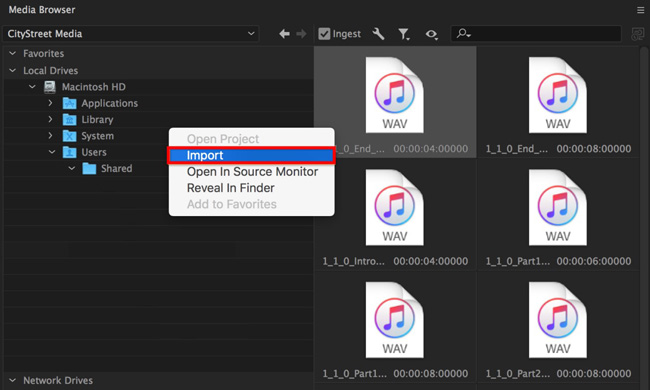
Adobe Premiere Pro is certainly one of the best pro tools to change audio sample rates powerfully and favorably. It's credible to make your audio extracted and edited from a video file. You have 7-day expiry to make changes and edits with this software on your computer, no matter whether it's Windows or Macbook. You can change the audio sample rate into wanted 44.1, 48 kHz, or other higher values. Now, just import your files, to begin with a fresh project.

Next up, go to the "Export" panel where you see the buttons to fine-tune effects, videos, audios, captions, and so forth. That is to say, apart from editing audio files with Premiere Pro, this panel is bound to make more advanced or simple changes to any imported file. All you need to do is click the "Audio" and "Sample Rate", then you will see the sample rate option. When it is over, click the "Export" button to download the file.
4. How to Change Audio Sample Rate in DaVinci Resolve
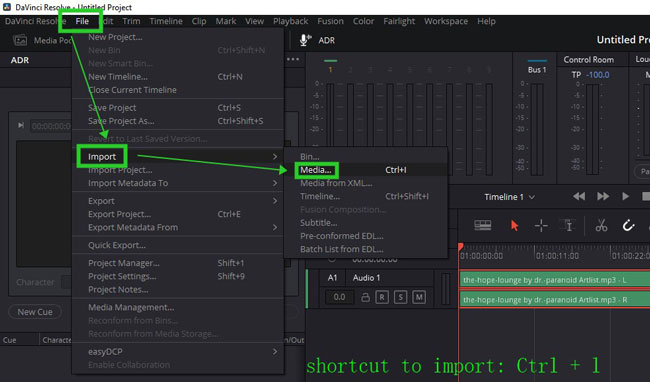
You may want to figure it out to edit audio with DaVinci Resolve. It's an all-in-one software for audio and video editing in Windows and Mac. There is a specialist window for audio where you can enhance, trim, cut, reverse, and adjust related parameters. The shortcut to import a file is "Ctrl + l", or click the "File" from the menu, and then open up the "Import" and "Media". By the way, Resolve has updated to version 18 right now, without watermarks along with as before yet you cannot apply built-in effects for free.
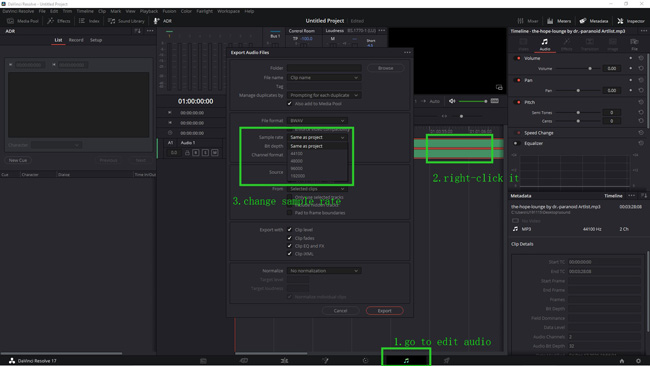
Different from AceMovi and AConvert, DaVinci resolve leads you to switch to other panels to make audio editing workflow with ease. The switch button is set below the middle part, and you need to turn to the "Audio" plate. Later, right-click the clip to export it, then go to the "Sample rate" line to convert the default number into the wanted one. Finally, press the " Export" icon to download your files.
Conclusion
Have you learned the way and finish your job successfully? As a matter of fact, you can rely on those software and online tool to continue to edit audio files. Advanced editing workflow can try the AceMovi and Logic Pro, while AConvert provides you with an easy interface based on webpages.