
Live Photos is a special feature on iPhone 6s which is introduced in 2015. This feature allows users to shoot a small video for 3 seconds. When you click the Record icon, camera will record the 1.5-second scenes before and after that time respectively. If you are a iPhone user, you may sometimes find that your photo is live which means you open your Live Photos feature. While the live photos is live in your Photos app, the live photos will become still images. If we want to share the live photos as videos, what can we do? Here we summarize some ways to save a live photo as a video on your iPhone /iPad/Mac.
- Part 1: How to Export a Live Photo as Video on iPhone /iPad/Mac
- Part 2: How to Convert Multiple Live Photos to a Video on iPhone
- Part 3: Some Tips Before Shooting a Live Photo
- Part 4: Bonus: How to Edit Live Photos
Part 1: How to Export a Live Photo as Video on iPhone/iPad/Mac
If you have shot a live photo on your iOS device, you can follow these steps to save a live photo as a video.
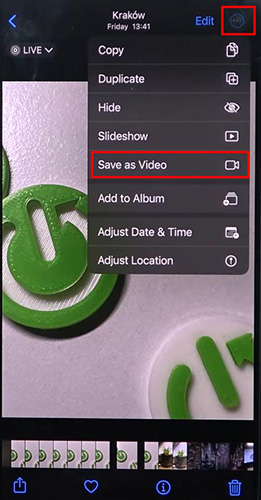
On iPhone/iPad
Step 1: Open the Photos app on your iPhone/iPad;
Step 2: Tap on the live photo you want to save as a video;
Step 3: Tap on the three dots icon on the top right of the screen and choose the Save as Video option; the video will be saved next to the live photo.
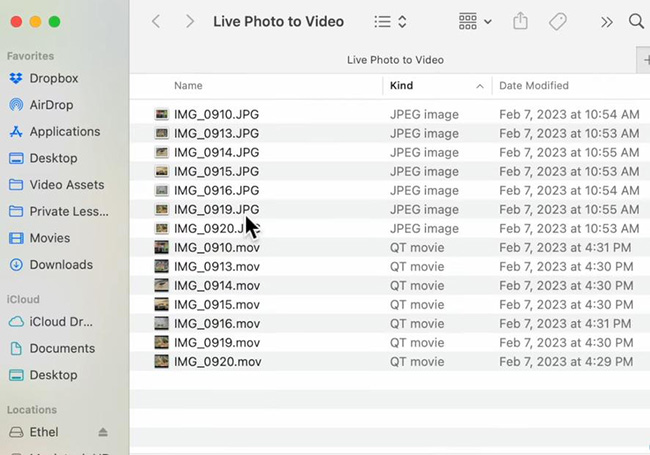
On Mac
Step 1: Open the Live Photos part;
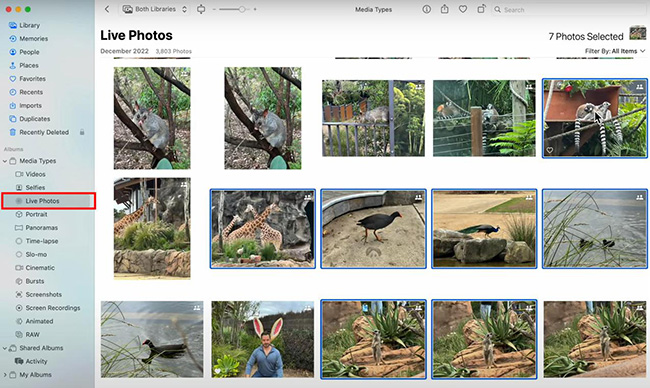
Step 2: Choose the live photo you want to export as a video;
Step 3: Drag and drop the live photo into a folder on your computer and then the photo will be saved as a video(.mov) and an image(.jpg).
Part 2: How to Convert Multiple Live Photos to a Video on iPhone
Maybe you have shot several live photos and you want to merge them into one video. Here is the easiest way to save your live photos as a video on your iPhone.
Steps to save multiple live photos as a video on iPhone:
Step 1: Open the Photos app on your iPhone;
Step 2: Choose the live photos you want to put in the same video;
Step 3: Click the three dots on the bottom right of the screen and choose the Add to Album option to create a new album for those live photos;
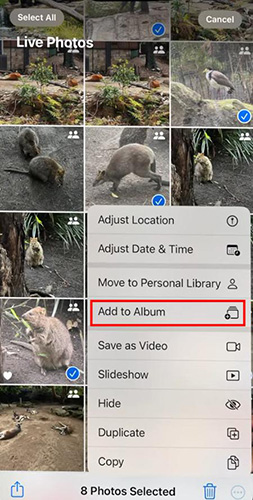
Step 4: Once you add those live photos to a separate album, you can adjust the order of those live photos through each live photo; or the order will be the time order;
Step 5: Choose all the live photos in the album and click the three dots on the bottom right of the screen and choose the Save as Video option.
Part 3: Some Tips Before Shooting a Live Photo
Are you annoyed to reset the live photos settings? Here we summarize some tips for you to save the last settings. If you are a beginner for Live Photos, these tips will let you have a good beginning on shooting a live photo.
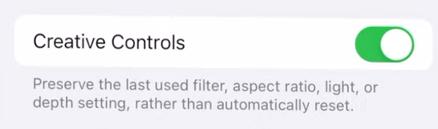
Open the Creative Controls
This setting will allow you to preserve the last used filters, aspect ratio, light, or depth setting. After that, you don’t need to reset these settings. To open it, you just need to open the Settings app on your iPhone and then click the Camera > Preserve Settings > Creative Controls.
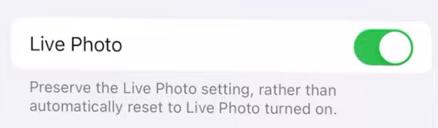
Open the Live Photo
This setting will allow you to preserve the Live Photo setting, rather than automatically reset to Live Photo turned on. To open it, you just need to click the Camera > Preserve Settings > Live Photo.
Part 4: Bonus: How to Edit Live Photos
A good video needs polishing. If you want to upload your live photos to your social platforms, it is necessary to learn how to edit the video after live photos are exported as a video. If you are looking for a useful video editor, TunesKit AceMovi Video Editor will be recommended here.
TunesKit AceMovi Video Editor is a simple but professional video editor. It not only has basic features like clipping and trimming videos, merging videos, and adding audio and pictures to videos, but also has advanced features like adding filters, transitions, and animations to videos. Every feature is easy to use. Even though you are a beginner for video editing, you can learn this software quickly. We need to know that the video saved from a live photo is a MOV file which is not compatible with some devices and social platforms. AceMovi can help you convert the video from MOV to more than 20 formats such as MP4. If you need, you can export the video as a format which is compatible with some special platforms such as YouTube, Instagram and, TikTok.
AceMovi Video Maker
- Record high-quality videos
- Video Effects such as filters, transitions, and more
- Support for a wide range of video and audio formats such as MP4, AVI, and MOV among many others
- Advanced Color Correction tools and algorithms are designed to help you adjust the brightness, contrast, and saturation of your videos.
Here is some basic steps to edit a live photo with TunesKit AceMovi Video Editor.
Download and install TunesKit AceMovi Video Editor on your computer, Windows or Mac;
Open the software and click the Import button to import the live photo into the software;
Drag and drop the video from the Media panel to the timeline on the bottom of the software;
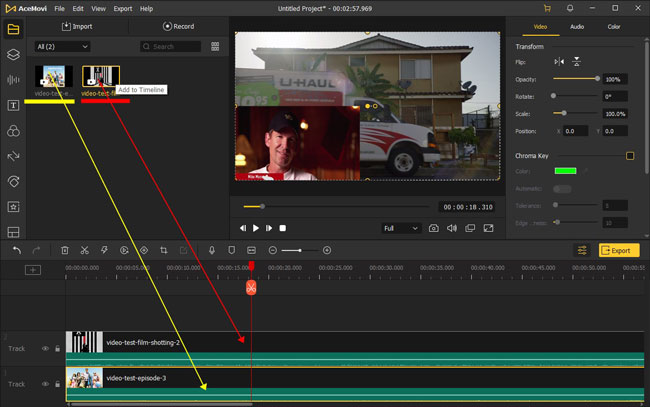
On the top of the timeline, you can split, speed up or slow up and crop the video by clicking the corresponding icon; on the left of the software, you can add audio, text, transitions, animations, and split screen to your video;
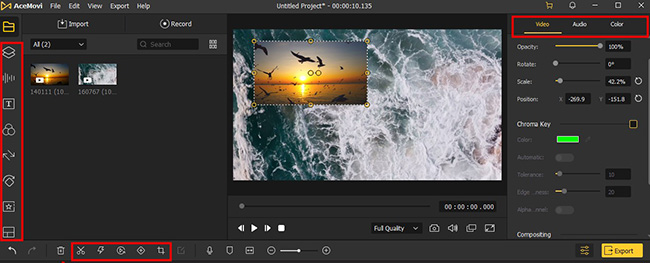
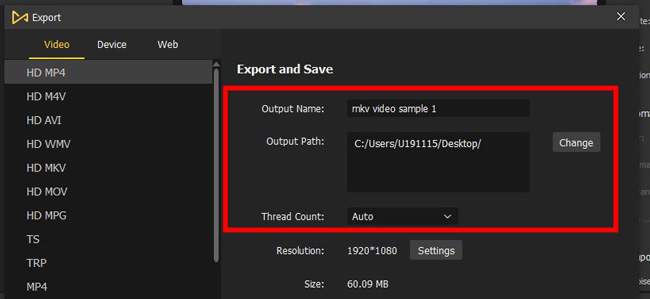
When you finish editing, click the Export and there is a new pop-up;
Provided that you want to convert the video to MP4, just click the Video > MP4 options; provided that you want to export as a platform format, just click the Web > YouTube/Instagram...;
After you name your video and choose the local folder to save the video, click the Export button to save the video to your computer.
The Bottom Line
Live Photos can record many beautiful times. When you share it as a video with other people, they may also feel your happiness. Now you have learned how to save a live photo as a video, you can share it to your friends or fans. If you are not so satisfied with the original videos, you can edit it and make it perfect with TunesKit AceMovi.