
Video editing is an interesting and imaginative field, thanks to the different thoughts of video makers and various video editing skills. Reversing video is a special video editing feature that can make a video play from its end to its beginning so that viewers can experience the feeling of going back in time. Although most video editor has this feature, the ways to use it are different. Today, we just discuss how to reverse a video on CapCut on your phone and PC.
- Part 1. How to Make Video Reverse in CapCut on Phone
- Part 2. How to Reverse a Video on CapCut Desktop
- Part 3. How to Reverse Video in CapCut Website
- Bonus: CapCut Alternative to Reverse Video - TunesKit AceMovi

- More Tips for Reversing Video in CapCut
Part 1. How to Make Video Reverse in CapCut on Phone
Step 1: Download CapCut app on your phone and then enter it;
Step 2: Tap on the + icon at the top of the screen to create a new project;
Step 3: Select the video you want to reverse;
Step 4: Tap on the Edit icon and then swipe left the toolbar until you see the Reverse icon;
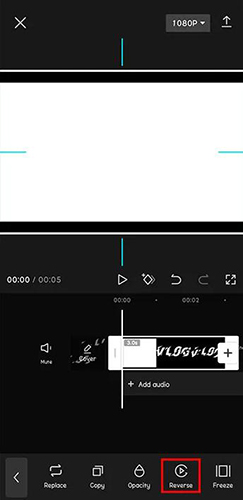
Step 5: Wait a minute and preview your video; you will find that your video plays from its end to its beginning.
Step 6: Tap on the icon at the top right of the screen to export the video.
Part 2. How to Reverse a Video on CapCut Desktop
Step 1: Open the CapCut software on your computer;
Step 2: Import your video to the timeline;
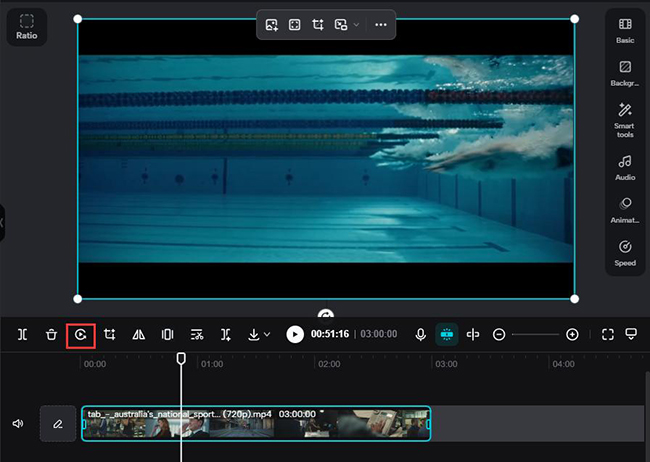
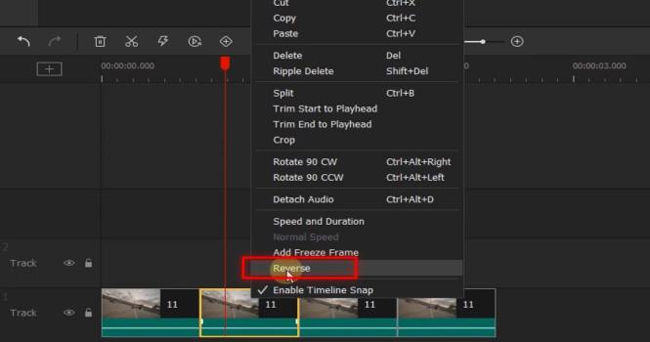
Step 3: Select the video on the timeline and then click the Reverse icon on the toolbar at the top of the timeline; or you can right-click the video to go to the Edit option and then choose the Reverse option;

Step 4: Wait a minute and play your video on the preview window;
Step 5: Export the video.
Part 3. How to Reverse Video in CapCut Website
Step 1: Visit the CapCut website on your computer and find the Free Online Video Editor;
Step 2: Enter the video editor and import your video to it;
Step 3: Add the video to the timeline;
Step 4: Click the video on the timeline and then click the Reverse icon at the top of the timeline;
Step 5: Preview your video on the preview window;
Step 6: If there is no problem, you can click the Export icon to save it to your computer.
Bonus: CapCut Alternative to Reverse Video - TunesKit AceMovi
Whether you're editing for YouTube, TikTok, or any other platform, TunesKit AceMovi offers the versatility and tools you need to make your content stand out. With its intuitive interface and comprehensive feature set, AceMovi simplifies the editing process, saving you time and effort. The reverse function in AceMovi allows you to effortlessly play clips backward for unique visual effects. AceMovi equips you with everything you need to bring your vision to life with precision and flair.
Apart from basic video editing features, AceMovi also offers rich text, filter, transition, background music, etc. templates. Those elements are flexible so after you choose them, you can edit or redesign them as you want. To make your editing more efficient, AceMovi has set popular formats for those popular social media.

TunesKit AceMovi Video Editor
Security Verified. 5,481,347 people have downloaded it.
- Advanced Color Correction tools and algorithms
- Basic and advanced features that make your video better
- Multiple filters, transitions, text, sound effects, music
- User-friendly interface
- Import as many photos or footage as you want
How to reverse a video via TunesKit AceMovi
Download and install software
TunesKit AceMovi is a PC software so you need to download it first before you start to use it; you can click the Free Download button to download it now;
Import a video
Open AceMovi and then click the Import button to put your video into AceMovi Media panel; or you can drag and drop your video directly to the timeline;
Reverse your video
Click the video on the timeline and you can click the Reverse icon on the toolbar to make your video reverse; or you can right-click the video and then choose the Reverse option to reverse your video;
Check your reversed video
On the preview window, you can check the effect of your reversed video; the audio of the video would be an important point you need to notice because you will find that audio in that video is also reversed and it sounds like noise or not so pretty; so you should adjust it reasonably;
Edit video
After reversing, you can use the features in AceMovi to continue to polish your video;
Export video
You can click the Export button to enter the export window; on this window, you can select the output format for your video so that it can be uploaded to your target platform.
More Tips for Reversing Video in CapCut
1. Keep in mind that reversing a video may affect its audio
Generally, a video and the audio in it align well with each other. However, if you reverse the video, its audio will be not harmonious with it. So if your video has important audio elements, consider adjusting or removing them before reversing.
2. Experiment with different speeds and effects
When you use the reverse feature, editing your video with a suitable speed and effect can get a unique visual effect.
3. Practice regularly to improve your editing skills and efficiency.
Conclusion
Reversing videos in CapCut is a simple yet powerful technique that can add a dynamic element to your video projects. By following the step-by-step guide outlined in this article, users can easily reverse their video clips and unleash their creativity in storytelling and visual expression. Apart from CapCut, AceMovi would be a good option to reverse a video and make a pretty video. The methods to achieve a goal are varied, and you can choose the one that best suits you. Hope this post helps you in terms of reversing a video.