
"Blender is a really good-to-use tool used for 3D animation and modeling suite, but do you know Blender can also be used to edit MP4 videos?"
Blender is open-source and free software, whether you are a modeler, VFX maker, game player, animator, or video editor, Blender can be deemed as one of the best options in the video editing market to choose from. However, it’s not easy for everyone who wants to do edits on this tool. Especially for newcomers, that would be tough to use this video editor. Don’t worry! Herein I’ll give you a full-scale tutorial on how to edit MP4 in Blender. Also, if you find it really hard to use, you can try the best alternative as well. Let’s get started!
- Part 1. Introduction of Blender Video Editor
- Part 2. How to Import Video in Blender Video Editor
- Part 3. How to Add Subtitles to MP4 Video in Blender
- Part 4. How to Do MP4 Video Color Grading with Blender
- Part 5. How to Edit the Soundtrack of an MP4 Video in Blender
- Part 6. How to Save Edited Video in Blender
- Bouns: Best Blender Alternative on Windows and Mac

Part 1. Introduction of Blender Video Editor
There are principally two methods on how you can edit MP4 videos in Blender. One is the compositor, and the other is the video sequencer. The video sequencer is a complete video editing system that can help you append and combine various video channels while also allowing you to add effects. These effects can be used to create powerful video editing, especially when you combine this entire method with the powerful animation capacities that Blender has. Now let’s check the pros and cons of using Blender to edit an MP4 video.
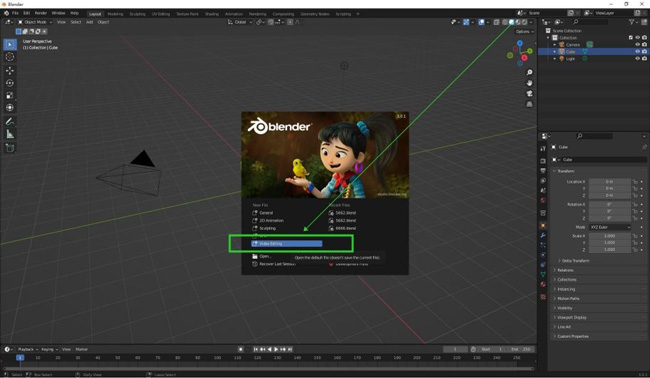
Besides, a few projects are set on Blender’s interface including General (3D), 2D Animation, Sculpting, VFX, and Video Editing. You need to press the Video Editing project to start editing MP4 videos.
Pros:
- Pretty strong and effective sculpting, character creation, and modeling
- To proceed with creating meshes, any object can be split into a certain number of elements easily
- Before MP4 video editing in Blender, the file will be separated into a video track and an audio track automatically
- Unlimited tracks to edit MP4 video, you can add texts, transitions, masks, sounds, sequences, etc.
- Watermark-free
Cons:
- The software developers should have included a troubleshooting icon, just in case any designer increases in issue with the software
- For beginners and first-time users, the UI of Blender can be intimidating and confusing
Language
Use the path edit-interface-translation and then choose the language from the interface, tooltips, and new data.
Input Devices
If you have a keyboard without the number pad, enable the number pad emulator by following the path Preferences > Input > Keyboard > Emulate Numpad.
If you have a mouse with only two buttons, not 3, you can enable a third-party mouse button by following the path Preferences > Input > Mouse > Emulate Three > Button Mouse.
File & Paths
You can set various options like what external image editor you wish to use, GIMP or some other, and the animation player itself by following the path preferences-file paths.
You can choose which temporary directory you want to store files like Auto-Saves and Temporary Renders.
Part 2. How to Import Videos in Blender to Start
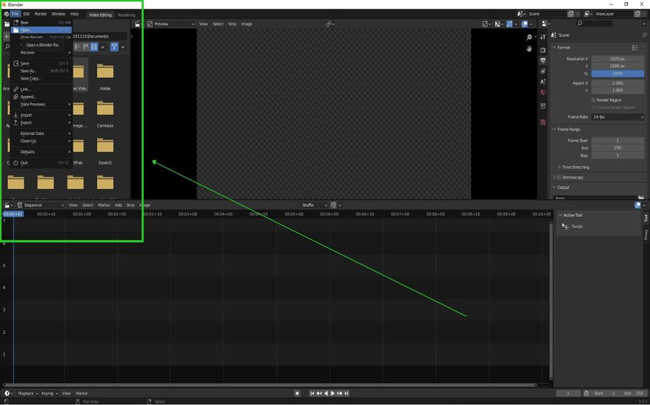
Once you have installed Blender, you will want to configure it before using it. So let us briefly into some preferences that you may wish to set at the very outset. Please remember not the entire explanation, and a more detailed analysis of preferences can be found in Blender’s own documented section called preferences. After getting into the mode of MP4 video editing in Blender. You’ll see a new interface.
So how to import your MP4 files in Blender? That’s very very easy! You got two methods. The one is going to File > Open, then choose the wanted MP4 file locally. Or drop the video under the timeline directly.
Part 3. How to Add Subtitles to Video in Blender
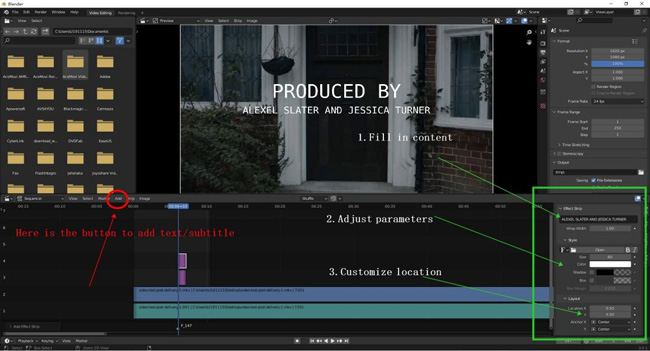
One of the disadvantages of Blender is that you cannot customize the MP4 video elements on the canvas. This makes it hard for beginners, so if you want to know how to add a subtitle in Blender, you must follow:
Step 1. Text Plate: Go to the toolbar and click Add > Text;
Step 2. Related Settings: The Text plate will pop up on the right bottom where content filling, color, size, shadow, box, box margin setting, and location repositioning are available;
Step 3. Special Effects: Scroll down on the Text plate, you’ll find the buttons to make text transformed and cropped. You can set text duration here as well.
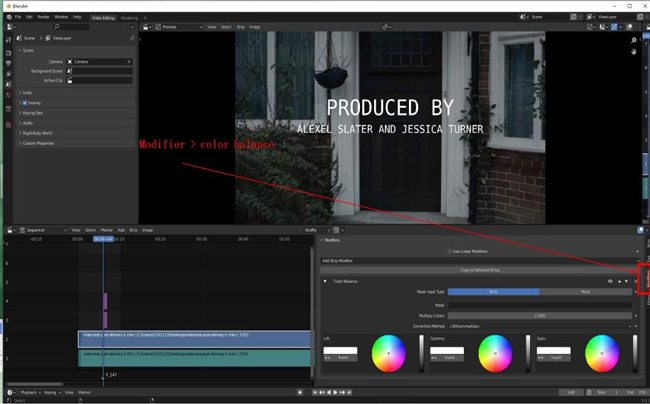
Part 4. How to Do Video Color Grading in Blender
To make and edit a standard MP4 video, don’t ignore the color grading! Color grading means how you truly enhance or alter the color of your video image, still images, and even motion pictures. Color grading enables videographers to achieve particular visual moods or tones. With Blender, color grading can be done in the following five steps.
Step 1. Normalize Video Clips. It would be best if you always corrected the saturation and contrast to take absolute advantage of the information you recorded, and I’m going to edit in Blender;
Step 2. Video Color Correction. Once you’ve normalized your clips, you need to color correct your entire video. If your video exposure is bad, your white balance is off, etc., actual color grading will become extremely difficult. Editing a video in Blender requires such color correction to be checked and performed;
Step 3. Color Grade Your Entire Footage. You must color grade your entire footage when you’ve completed your color correction. You can do this manually since it could give you more control. However, it will also be more time-consuming. You may use a LUT, but only if your clips are color corrected properly. Blender provides such color grading so that you can better edit videos in Blender.
Step 4. Specific Color Adjustment. In case you have used a LUT to color grade your footage, the chances are that it wouldn’t be perfectly done. The LUT you have used me has added too much of a particular tint to your footage. So after your color grade is over, always go back and correct any problems so that your entire footage is consistent across every clip.
Step 5. Vector Scopes and Skin Tones. The main problem with color grading videos is that you cannot completely depend on what you see on the monitor. Monitor calibration and ambient lighting and alter how you see the video displayed. Truly enhanced video editing programs and software like Blender will always provide you with perfect solutions to these problems. Blender allows various vectorscopes and skin tones to be corrected and normalized even after your final color adjustment has been completed.
Part 5. How to Edit the Soundtrack of an MP4 Video on Blender
Audio editing is one of the most important parts when making MP4 video in Blender. By default, Blender will separate the audio track from the imported video track. As a result, if you want to edit the soundtrack, just click the track at the very beginning. Here are the details.
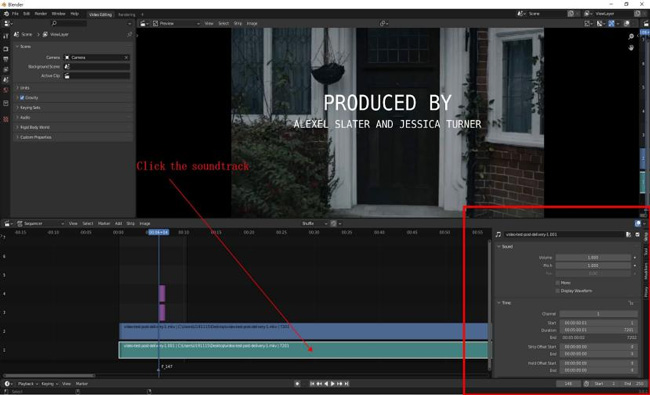
Step 1. Basic Audio Edits. Blender empowers you to increase and decrease volume. Either to fill in the numbers or click the Up and Down buttons;
Step 2. Pitch and Pan Effect. Below the volume settings, you can change the pitch and pan effect;
Step 3. Play in Real-Time. You’re allowed to play the video in real-time to check the audio effect;
Step 4. Text Duration. If you want to adjust the audio duration, you can set it on the Time plate.
Part 6. How to Save the Edited Video in Blender
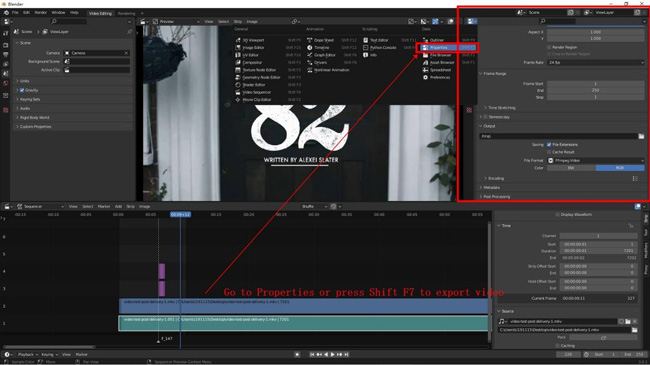
Finally, I believe you must want to know how to save edited video in Blender. You need to open up the Plug-in changer and choose the Properties or press the shortcut Shift + F7. Then the exporting plate will pop up on the right upper place.
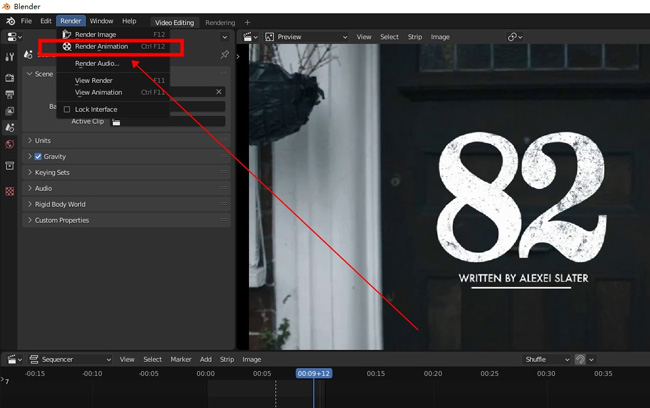
You can set resolution, aspect, frame rate, output format, and more in this place. Lastly, you need to go to Render > Render Animation or press the shortcut Ctrl + F12. When the rendering is done, for example, you’ll see a file named "0001-0026.mp4" in the save-path.
Bouns: Best Blender Alternative - Add Text to Videos [TunesKit AceMovi]
Provided that Blender is complicated to use and you cannot customize elements on the canvas, choosing an alternative of it might be a good option. If you want to edit MP4 video on Windows and Mac, TunesKit AceMovi Video Editor must be the first choice! It’s a beginner-friendly video-editing toolkit that is efficient to use and is way simpler than any other video editor.
The UI is simple and responsive, making it easy for anyone and everyone to make full use of the software. With AceMovi, you can easily crop an MP4 video, trim an MP4 video, combine MP4 videos, convert video to MP4, and many more.

TunesKit AceMovi Video Editor
Security Verified. 7,021,997 people have downloaded it.
- Basic and advanced features that make your video better
- Multiple filters, transitions, text, sound effects, music
- User-friendly & clean user interface
- Import as many photos or footage as you want
- Make videos of PiP, Split-screen, Reversed, Slow-motion, and many more advanced features are included on the latest update version
- Able to remove watermark from any video by cropping, blurring, & covering
In the following, you’ll see how to add text in MP4 video with AceMovi Video Editor.
Prepare to edit video
AceMovi’s trial version and full version are free to download on Windows and Mac. All basic and advanced effects on the trial version now are the same as the full version. With the full version, you can remove the watermark when exporting videos.
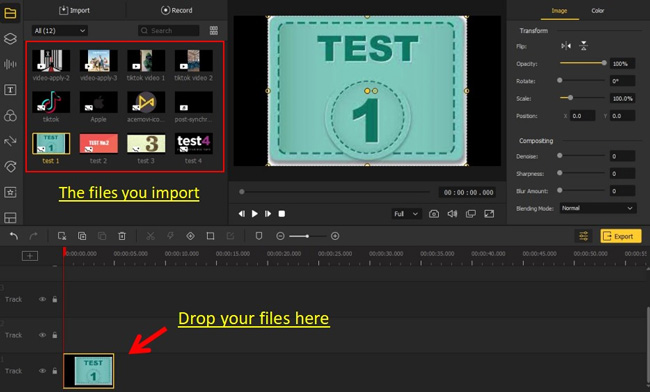
To import files in AceMovi, you can do the drag-&-drop or go to File > Import.
Go to Edit MP4 Video with Texts
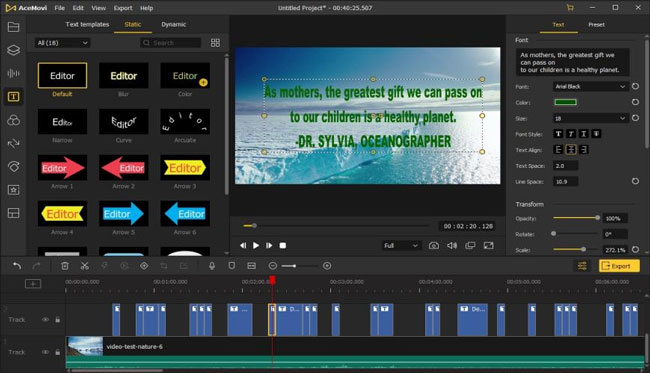
On the left-hand sidebar of the window, navigate and click on the Text icon. There you will find hundreds of off-the-shelf templates for overlaying text on video and two different types of texts – Static and Dynamic. Here you can choose the style of text you like, and then you need to drag and drop the text to the timeline where you wish to add it.
More importantly, you can just customize the video on the canvas like resize aspect ratio and make the video become split-screen. The Properties icon are set on your right hand, which helps you adjust text color, font, size, position, opacity.
Export Your Video
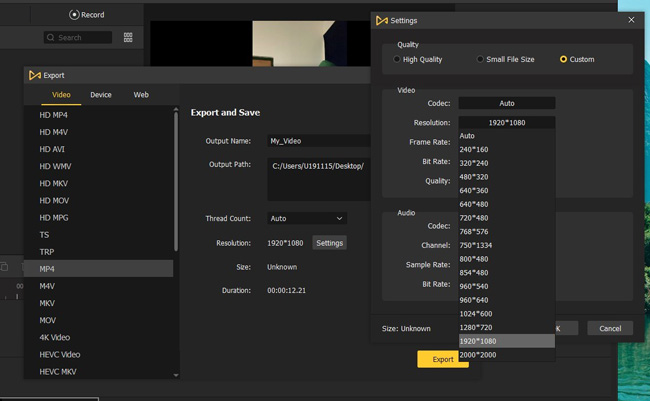
If you want to upload the new video on YouTube, Facebook, or Vimeo, go to Export > Web > YouTube/Facebook/Vimeo. Or just download the video by opening up Export > Video > HD MP4. More settings are provided here like resolution, codec, bitrate, quality, frame rate, etc.
Final Verdict
Since Blender is a brilliant GL and 3D animation editing, there are various communities and forums and third-party developers who contribute to the advancement and updates of Blender constantly. However, the normal video editing technology still needs improvement in convenience and flexibility. If you need an easy alternative, TunesKit Audio Capture would be a good choice. If you got any thoughts about this topic, leave your comments to us below!