Dissolve transition moves from one shot to another in a short time with no color pause between them, whereas other video transitions, such as Fading shows some black colors as a cutter between the two clips. Dissolve can be applied for both obvious and intended use, which happens over 1-2s in every video clip at criteria of 24-48 FPS. For smoothing two or more pieces of footage that are joined or spliced together in one file, users add dissolve transition to video to print the incoming scene and the outgoing scene. If you want to know the skills to add such an animated transition or other transition genres to touch up the content you're working on, try the following guides.
- 3 Types of Dissolve Transitions in Films (Include Examples)
- Add High-Fidelity Dissolve Transitions to a Video on Mac & Windows
- How to Put Dissolve Transition between Two Shots in Premiere Pro
- How to Insert Transitions of Dissolve in Films without Lags Online
- Summary
Dissolve Transition Types [Examples Included]
Match Dissolve Transition
The match dissolve in movies like Saving Private Ryan where one of the frames dissolves into another one, and the frame composition keeps at its original value. The focal length may be altered by the movement of the shot. Compared to other types of transitions, match dissolve seems more natural. Let me show you one example of it:
Cross Dissolve Transition
The first shot fades out while the latter one fade in comprising the cross dissolve, which is widely used in some films such as The Godfather, which is one of the 1972 U.S.A films directed by Francis Ford Coppola. This transition is one of the most popular effects in old movies, below is an example:
Fade/Wash Dissolve Transition
If you want to represent changes over a long period of time, then you must need to try the fade/wish dissolve transition which composes two main shots that shows the different scenes about one item in 1-2 seconds. It is a surprising video transition for advanced post-production. Fading means from black while Washing means from any color. Titanic used this dissolve transition to represent the changes of the steamer:
Add Dissolve Transitions to Your Video with TunesKit AceMovi for PCs
AceMovi is a well-performed video editor for beginners in adding transitions, filters, and animations. There are over 80+ diverse kinds of video transitions in the built-in stock, including Movement, Fading, Overlay, Wipe, and Blurry. Compared to other tools, AceMovi's embedded elements are all free to use.
Merging multiple files under the same track or cutting out a video into several parts is as easy as importing the files by dragging-n-dropping. The video transition editor allows you to preview each sample and play the video in real time for effective comparison. You add large-size files or long videos to this 4K/1080p/720p software and learn how to add dissolve transition to your video here.
AceMovi Transition Editor
- Customize the canvas manually or automatically
- Presets of the aspect ratio include 16:9 and more
- Export your video for social media platforms
- Multiple tracks for mixing and compounding files
- Top-notch music effects, titles, stickers, etc.
- Video recorder, trimmer, speeder, and converter
Guides to Add Dissolve Transitions between Video Clips with AceMovi
Download TunesKit AceMovi for free. Click "Import" to upload video
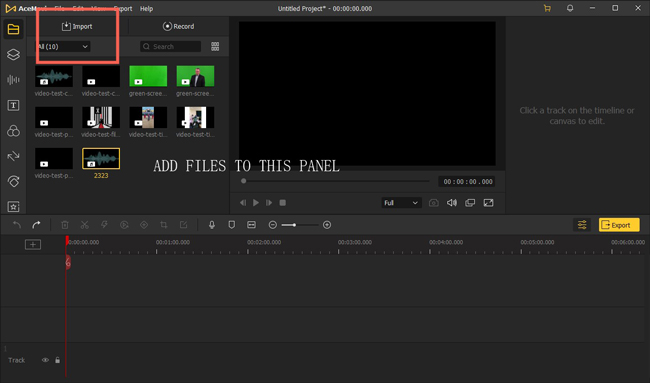
Tap on the following buttons to download this video editor on your computer. You will find AceMovi lightweight to use because of the streamlined operation timeline and multipurpose toolbar. Speaking of uploading your videos, just hit the "Import" button on the interface to put these media under the timeline.
Pick up the dissolve transition from left-side bar. Polish the transition
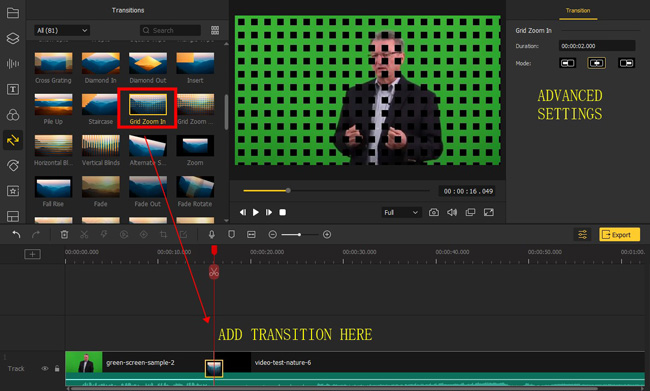
The majority of video transitions are set inside the left-side bars, such as sound effects and animations. Find the "Transition" bar, find the "Grid Zoom In" mode, and put it between the two clips on the Track place. Then it sticks to the clips automatically.
You can play the video and see what's the exact movement of the transition. In the "roperties" panel, you're allowed to fine-tune the duration and shifting pattern of the transition.
Edit your video with trimming and cropping. Download your video
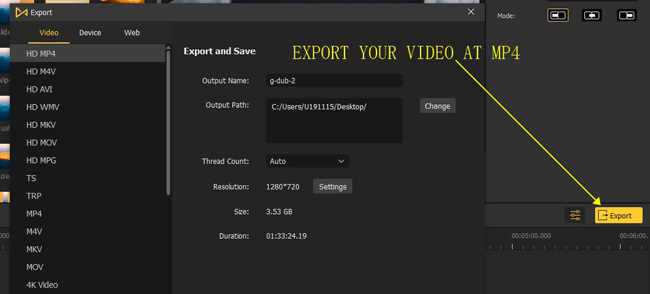
You can continue to edit the project with other tools if necessary, like trimming, speeding, reversing, and cropping. For example, when you find some parts that shouldn't be exported together, just move the red playhead under the cutting point, and click "Trim" from the toolbar. Then delete the trimmed part.
When it comes to downloading your video from AceMovi, you can find both basic and advanced personal customizations from "Settings" in "Export". Change the save path, video resolution, audio bit rate, and output format based on your exact requirements.
Editing Videos with Dissolve Transitions in Adobe Premiere Pro
Want to know how to add a dissolve transition to the video in Premiere Pro? Even though Adobe Premiere Pro has a hard learning curve, it has become one of the most trendy video editing tools for most users. This software contains a variety of transitions and effects to enhance the performance of your content. If you’ve already downloaded it on a computer, you can launch it directly and follow the tutorials below.
Commence a new project, and add files to the timeline
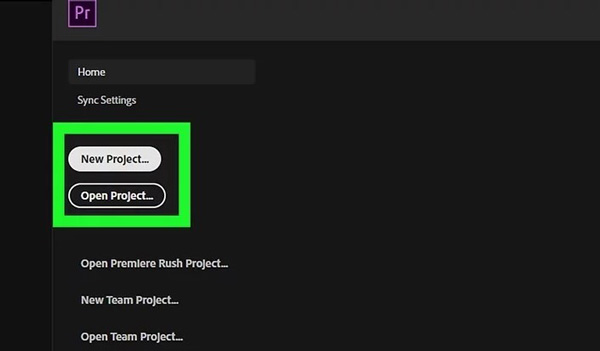
Once enter Premiere Pro, click "New Project" to begin. If you want to re-edit the video, open the project directly. Then you see the default video editing operation interface of it. Put your files into the timeline by drag-n-drop.
Go to "Effects" > "Video Transitions" > "Dissolve". Add transition to track
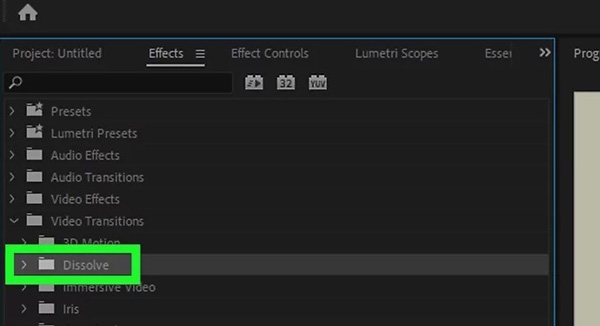
The Dissolve transition Premiere Pro is set inside the effect area. You navigate to it by following "Effects" > "Video Transitions" > "Dissolve". Choose one of the transition types and put it between the clips on the timeline.
Edit the dissolve transition in “Effect Controls”. Play video in real-time
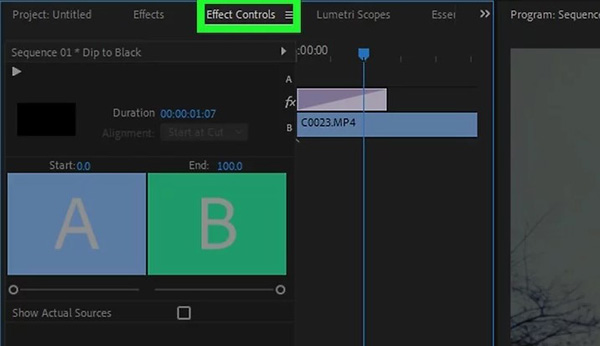
If you want to manipulate the transition's duration or changing pattern in Premiere Pro Dissolve Transitions, you can hit the button from "Effect Controls". Enter the time in "Duration" in seconds. Choose the alignment mode to reach the effect you want
Set the transition border width and height. Apply effects to enhance it
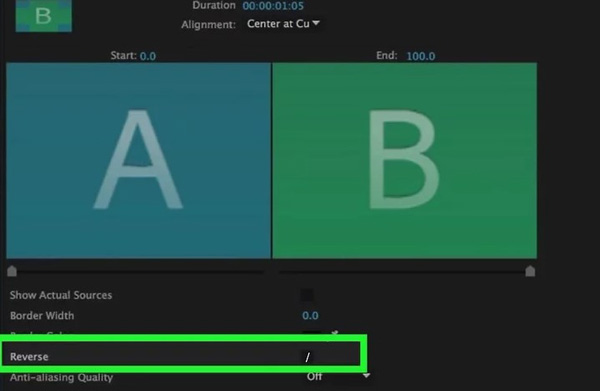
For more advanced settings like controlling the height and width of the border and reversing the representing mode, scroll down to discover more function buttons. As regards finishing the task, go to the "Export" window and set the output settings.
Add the Dissolve Transition to Clips Online with FlexClip
We know that online video editing programs now are powerful and brilliant enough to make an integrated video. Among several options, FlexClip supports more kinds of transitions and video effects. With such web-based tools, you do not need to download anything. FlexClip comes with real-time screen recording, video text subtitling, video format converting, as well as background color changing. Keep reading!
Search for "Add transition to video by FlexClip". Import videos

FlexClip supports a lot of video formats, like MP4, AVI, WMBV, MOV, M4V, and WebM. You find the video transition addition project in FlexClip. On the first webpage of that function, add your video and begin editing.
Hit the button between every two clips to add transitions from library
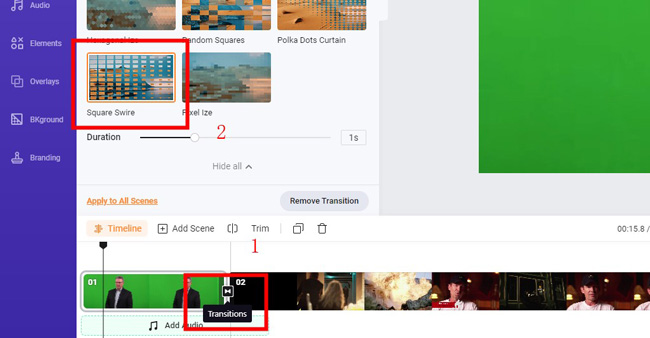
You need to hit the middle button between the two clips for opening up the panel for adding transitions to the video you’re editing. Then the Media place provides you with transition modes and preview options.
You can watch the preview and add the transition "Square Swire" by clicking it rather than drag-n-drop. After that, play the video footage to decide whether you like it.
Save the video online. Choose the video format and resolution quality

You can save your editing in the cloud for free, but the number is limited to a specific range. Apart from that, opting for the output resolution and video format from "Export". See the history or download the video directly online both are available.
Summary
Not every video transition editing program support dissolve transition, and you may not find the exact one, but you're empowered to try more types of transitions and play the video to watch the effect. Two advanced options to enhance the transitions you added to the video clip, one is the duration setting, and the other is the shifting mode.

