
Both Windows and Mac systems support users to record their screen or take a snapshot when watching a video, but one of the problems you need to pay attention to is that you cannot edit the screenshots and recordings firsthand, oftentimes, you need to download extra applications and plugins to make further editing, cropping, color grading, or quality enhancing. Don't worry! If you want to take a video screenshot and then try to edit it with creativity, this page will be very useful. You can also grasp how to use the best screenshot recorder and editor. Let's begin now.
- How to Capture Screen on Computers
- The Best Way to Take a ScreenShot on Windows 10 & Mac
- How to Do a Screen Shotting with VLC Media Player
- How to Make a Printscreen on iPhone & Android
- Conclusion
How to Take a ScreenShot on Windows and Mac
If you're a Windows 10 or 11 user:
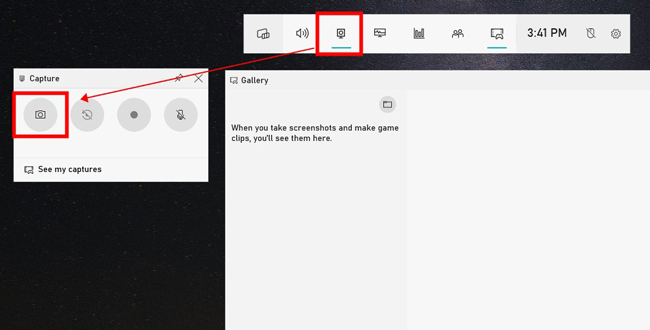
The first way is to press the "Windows + G" to launch the Xbox Game Bar. When it pops up on the screen, click the third icon "Capture" from the toolbar, and then take a screenshot of your video. It's allowed to see your captures from the "Gallery" panel. Alternatively, tap on "Windows + Alt + Prtscrn" directly.
By the way, if you want to get a portion of the screen on Windows, try the shortcut of "Windows + Shift + S". In this case, you can customize the size of the area.
If you're a Mac user:

For Mac users, the "Shift + Command + 3" is about to take a full screenshot. If you are going to capture only a portion of the video screen, press the "Shift + Command + 4". When you see a thumbnail in the screen corner, tap on it to record the screenshot or just wait for the automatic saving by the system.
AceMovi - The Best Way to Take ScreenShots on Windows 10 & Mac
The above are some of the channels to do video screenshots on your device. However, you may find they do not provide you with editing features like cropping and color balancing. If you want to get the best tool to take a video screenshot and modify it creatively, AceMovi worth a try.
AceMovi is a great, easy-to-master video and image editing software for computers. With one-time downloading, you can capture any clip from a video, mix the color, crop the size, and generate a photo collage. More importantly, AceMovi can help you automatically save the snapshots to the Media panel and edit them straight. Now, let's see the steps to use AceMovi.
AceMovi Screen Capturer
- Take a video screenshot with one click
- Streamlined, simple interface
- GIF, MP4, MP3, AVI, WMV, and DivX supported
- Customize the size of your captures
- A stable video player and screen/webcam recorder
- Applied to low-end computer versions
Tutorials: How to Take a Screenshot of a Video with AceMovi
Launch AceMovi from after downloading. Drop videos to the interface
Firstly, download and open up AceMovi software on your desktop. You can begin to register to buy the premium version to remove watermarks at a low price, or just start to capture without registration.
When it comes to adding media to it, you can drop the files under the Media panel, then put the wanted one under the timeline.
Play your video, and click the "Snapshot" button afterward
Play the video by clicking on the "Play" icon from the toolbar. When it hits the timing point, tap on the "Snapshot" icon. Then you'll see the thumbnails automatically saved in Media.
Edit screenshots with special effects. Fine-tune color and other properties
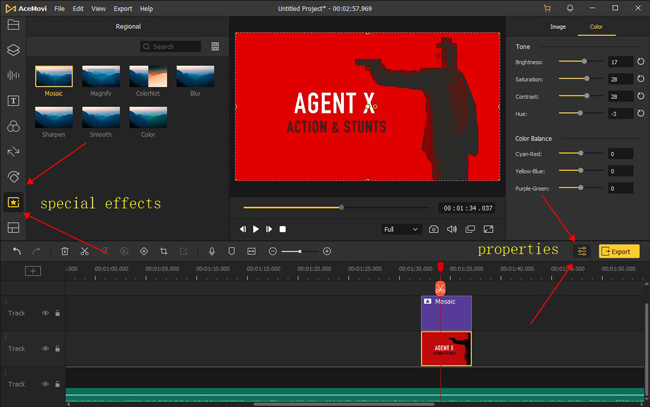
You may want to blur the background of the screenshot, or mosaic some areas. There are a handful of eye-popping features that can be used from the "Regional" panel on your left hand.
As for balancing the tone and color, you need to click on the "Properties" icon on your right hand. Now, slide the value sliders to manipulate the effects. AceMovi plays the changes in real-time without losing frames.
Change the save path of screenshot by pressing "Ctrl+Shift+,"
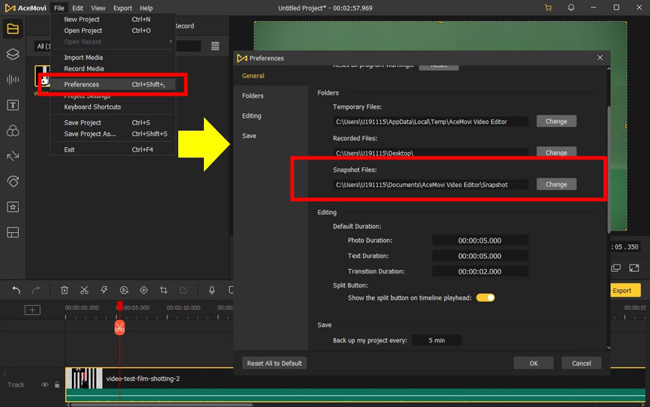
You can use the shortcut "Ctrl + Shift + ," or follow the menu "File" > "Preferences" > "General" > "Snapshot Files" to change the save path. In other words, you don't need to export the file, just find all the screenshots in the designated folder. For enjoying more features and effects, download AceMovi below.
How to Take a Video Screenshot with VLC for Win/Mac/Linux
Millions of users prefer to use VLC to play and edit video files because of its great user experience and free licenses. It's a linear software that comes with a plethora of video effects, such as Anaglyph 3D, Mirror, Psychedelic, and Waves. If you want to know how to take a screenshot from a video with it, go on to read this post.
Get VLC on your computer. Click "Media" > "Open File" to import
To begin a new project, navigate to the "Media" > "Open File" to select your wanted media files, which can be an image, videos, or music.
Click the camera icon from the toolbar to take a snapshot
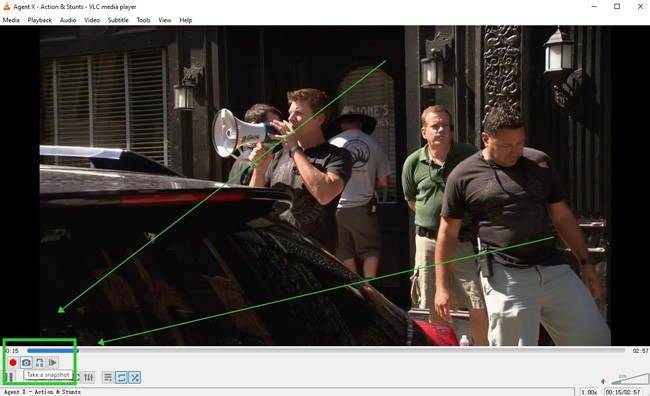
It's allowed to click the "Camera" icon from the toolbar for taking a video screenshot. You can also click the red icon to record the screen.
Change the save location by "Tools", "Video", and "Video Snapshots"
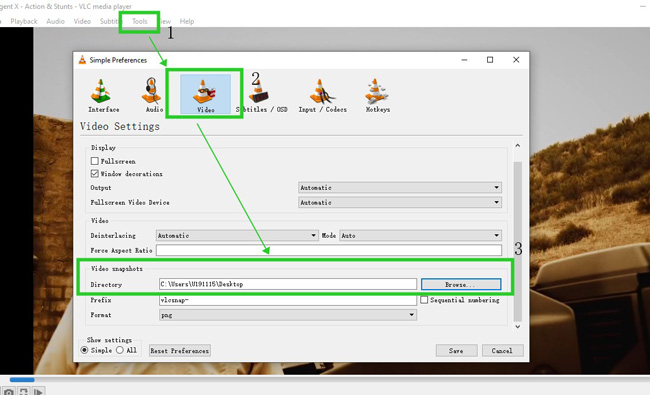
For changing the file location, you need to click the "Tools" icon from the menu, then follow "Video" > "Video Snapshots" > "Directory". The same as AceMovi, it's no need to convert or stream files from VLC.
How to Take a Screenshot Video on iPhone and Android
For iPhone Users:
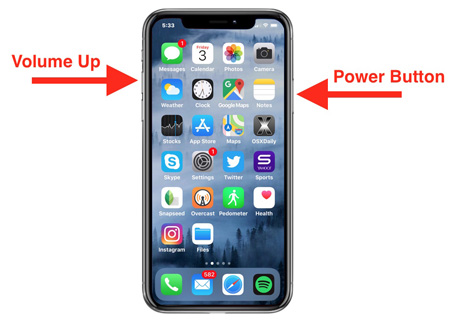
No matter whether you're watching a video from YouTube or any other media player on your iPhone, you can capture the screen by clicking on the "Volume Up" button and the "Power" button at the same time. Find the captures from the "Screenshot" in the album.
For Android Users:
On most Android devices, you can also take a snapshot from a video by tapping on the "Volume Down" button and "Power" button simultaneously. On top of that, some types of Android devices like Xiaomi allow you to use the "Three-Finger" gesture to complete this mission.
Conclusion
You can use those shortcuts to launch the pre-installed applications on your device. On top of that, AceMovi and VLC can help you more than taking a screenshot, both of which are powerful for video editing and photo collage creation. Besides that, there are amazing features for you to adjust the parameters of the captured screenshots with them.