
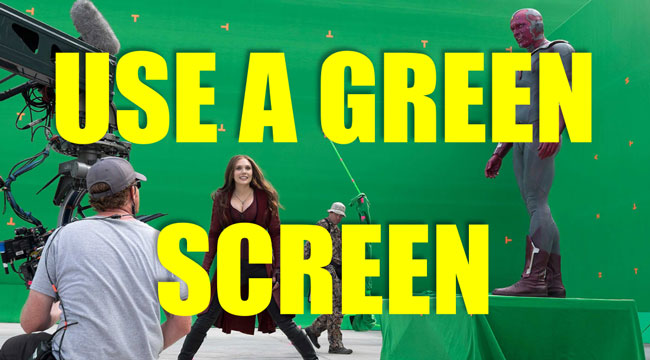
Green screen technology has been arousing a trend for many years. I need to say that the majority of our favorite movies and TV episodes will in practice apply a mix of the green screen and blue screen no matter whether they're doing the outside work of a studio lot, for example, the on-site news reporting or visual filming (e.g., the Marvel Cinematic Universe) in a remote place.
Surprisingly, today’s video editing programs are updating such tech for us content creators and uploaders to produce magics with VR backgrounds. Do you know how to use a green screen? Got you! This post will be introducing the best beginners’ tutorial on applying the green screen effect via the Chroma-Keying. Here we start!
- How to Use a Green Screen for Videos & Photos with AceMovi (Windows/Mac)
- How to Edit Green Screen Background for CapCut (Phone/Android)
- How to Make Green Screen Videos on iMovie (Mac)
- The Last Part
How to Use a Green Screen with AceMovi
AceMovi Video Editor is a popular software used and favored by millions YouTubers, Facebookers and TikTokers at present. First-time users will master AceMovi quickly from the easy-to-learn tutorials and trouble-free user interface where you can find any feature to edit videos, audio tracks, and images without any hassle.
Many tools may allow you to fine-tune the chroma key color and tolerance, while AceMovi comes with more than that - Automatic green screen, the adjustments of edginess, denoise, sharpness, and blur amount are under your control. You can find all of the chroma key colors from the Property panel. The following include buttons to download and use AceMovi, along with step-by-step tutorials.
AceMovi Green Screener
- Support all sets of green screen colors
- Advanced settings to edit video with VR background
- Beginners' helper in creating 60fps clips
- Applied to low-end Windows and Mac
- Drag-n-drop bare-bones using interface
- All sizes and types of photos and videos processed
Video Tutorial! How to Use Green Screen with AceMovi
When you have AceMovi on your computer, you can use it to do any type of file's green screen. Now, let's see the guides step by step.
Add Original and Background Clips
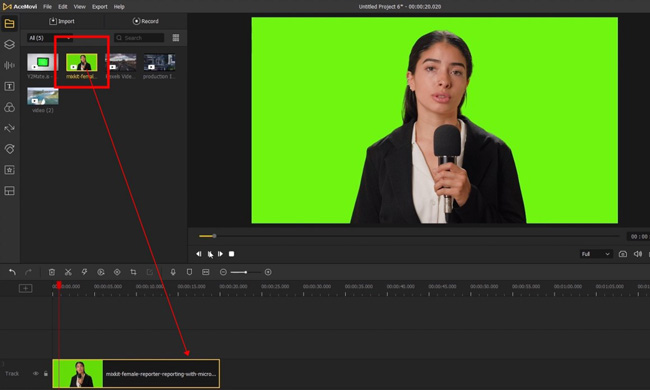
Firstly, click the "Import" icon to browse and upload your raw and background files from folders. There are no expiry limits and registration required for your trial license.
Edit Video with Green Screen
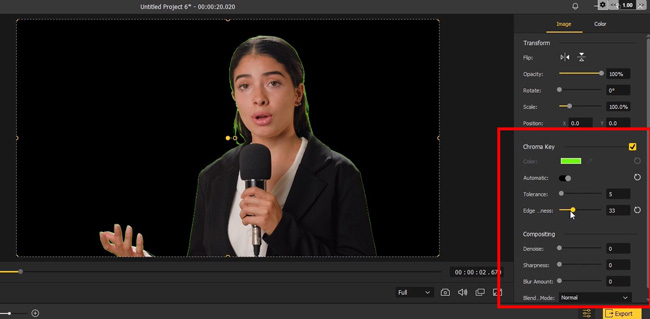
Now, launch the "Properties" in the right-side toolbar. Then tick the "Chroma Key" to remove the green screen background. You can fine-tune the color, tolerance, edginess, and more sliders to balance the effect. The monitor performance will render and playback your actions in real-time.
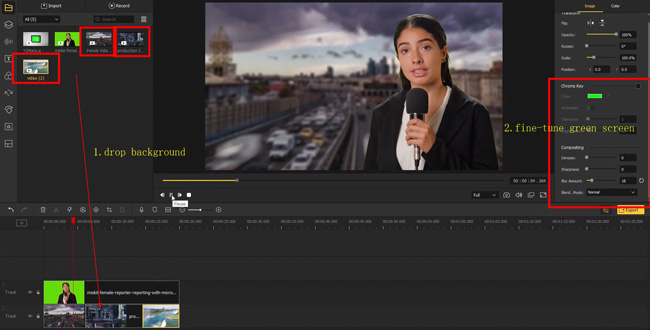
It's time to drop your picked background clips under the timeline track. You may need to drag-n-drop the original file under track 2, and put the background file under track 1.
Export Videos
To share your videos to YouTube, Facebook, Vimeo, or other websites, you should click the "Export" and "Web" icons. If you want to download the file, just choose the output format where you are accessible to MP4, WMV, M4A, MKV, AVI, DivX, etc.
How to Use a Green Screen on CapCut
You may desire to know how to use a green screen on iPhone and Android, here CapCut is recommended for you. CapCut is an all-in-one application that provides users with stickers, templates, background music, texts, and more elements. You can use it to edit video with a green screen portably and conveniently.
One of the most intriguing features of CapCut is to share your masterpieces on TikTok and Instagram in minutes. The HD and the Full HD resolutions are permitted. If you want to create a quick shot, you can start a template project. Here are the guides to using CapCut's green screen effect.
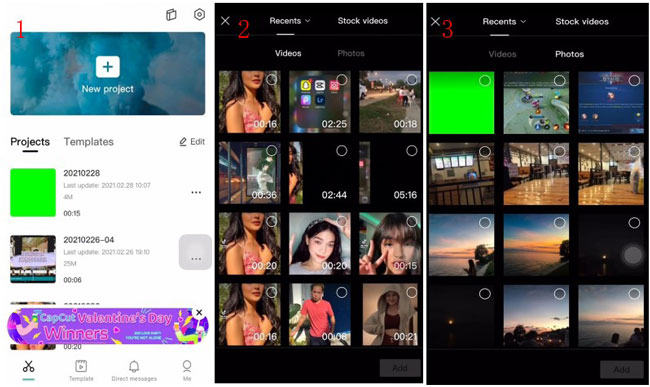
When you get into this program, click the "+" to upload your files, which can be videos and photos, from your album. For batch editing, just choose all of the wanted files.

Next up, slide the toolbar and press the "Overlay" icon. Now, you need to add another clip to overlay the first video. Then click the "Remove Background" icon and wait for a moment until you find the background of your video has been removed. You just created a clip without a background. Just click the icon in the upper right place to download or share. You can continue to add VR background to your edited video in this way.
How to Use a Green Screen on iMovie
What is the beginners' tutorial on how to use a green screen in iMovie? You must be Mac or iPhone user who finds iMovie is pre-installed on your device. This software is free for all users with a trackless and streamlined timeline. It's excellent to edit photos and videos with a green screen and offers meticulous settings for pro users. Here is the guide.
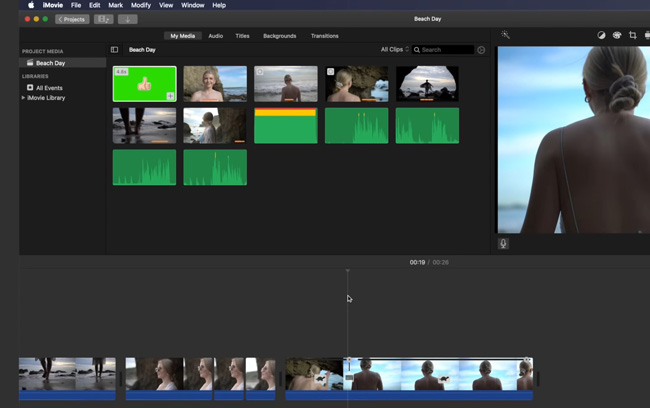
You can drop files under the timeline bluntly, then iMovie will automatically detect the objections and play them sequentially.
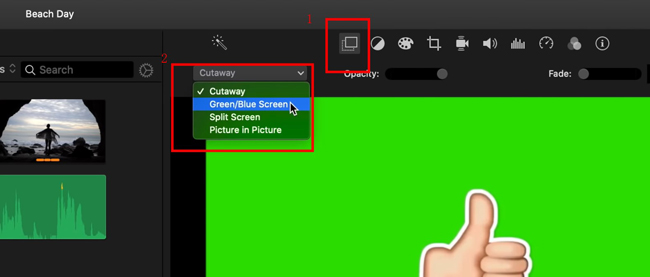
Now, go to the toolbar to click the first "Overlay" icon, in this way, the two imported clips will be as a whole. Then open up the dropdown menu to choose the "Green/Blue Screen" to launch the green screen effect.
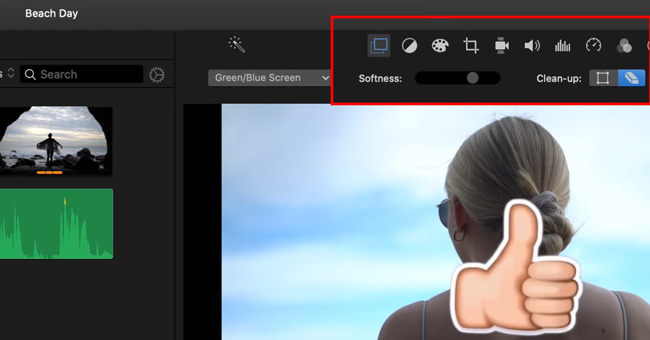
Finally, you have a set of tools to enhance and edit the green screened clips, such as the Softness, Clean-up, Saturation, Cropper, Color Grader, Volume Booster, and more. By the way, you can resize and reposition the clip on the canvas.
The Last Part
Here are the three tested ways to solve the question of how to use a green screen without Photoshop. AceMovi and iMovie are more fit for batch green screen and editing. You can download and use CapCut on both iPhone and Android. What is your green screen video creation experience, share with me.