
Modern video editing software allows you to tweak video material and generate high-quality, Hollywood-style films in a matter of seconds. Keyframing is a great video trick that editors employ to improve their videos.
Video editors use keyframes as markers or anchor points to define how they want a video to look at a specific point in time. When you place two keyframes several seconds apart, you'll generate a keyframe interval, which tells your editing application that you want your clip to transition from one state to another in the period you choose.
Keyframes may appear overwhelming at first, but keyframing apps like AceMovi simplify learning how to utilize them effectively. You may use these approaches to build bespoke animations and transitions in seconds after you understand the foundations of keyframes, keyframe interpolation, keyframe interval, and keyframe animation.
First, we are going to tell you about the keyframing definition. So, let's get started with it.
- Part 1. Keyframing Definition: What Is Keyframing
- Part 2. Advantages of Using Keyframing
- Part 3. How to Use Keyframing in AceMovi Video Editor
- Part 4. Conclusion
Keyframing Definition: What Is Keyframing
So, what is keyframing? The act of identifying the start and conclusion of animation and allowing your editing tool to fill in the transition between these two places is known as keyframing. This filling-in gives the impression of continuity between each keyframe marker's still pictures.
You must indicate when the movement begins and finishes to add an animation or transition effect to your movie. Keyframes are the markers that you use to indicate start and finish locations.
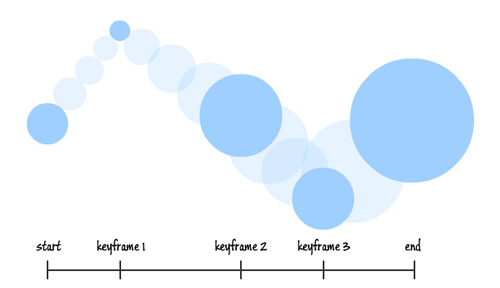
If you know "what is keyframing", you may also know that the first keyframe in your timeline represents the condition of your film at the start. The video's next keyframe denotes a different state.
Assume you wish to zoom in on an object in your movie gently. You may put a keyframe where you want the zooming to start and another where you want it to finish. You'd zoom into the final place on the second keyframe.
To reach your intended finishing point in the specified time, your editing application would automatically determine the pace at which the clip should zoom.
So, what is keyframing in video editing? Well, keyframes are used by content makers to execute a variety of effects and transitions in their films, including:
- Panning from side to side
- Fading out to 0% opacity
- Animating an object
- Zooming in or out
- Changing scale or position
- Rotating the video
- Adding overlays
A parameter is a name for each quality that you adjust in a keyframe. With keyframes, you may change as many settings as you like, and your editing application will transition from your intended starting point to your desired ending point automatically.
Advantages of Using Keyframing
So, after understanding the definition of keyframing in video editing, let's talk about the benefits of keyframing.
While managing keyframes in a movie might be difficult for a novice, keyframes can be useful if you get the hang of it. When you're working with hand-drawn animation, it's very easy to spot little flaws or problems. You may then track that frame or sequence of frames and take action.
When animating, for example, if an arm isn't moving in the appropriate direction, go to that specific frame in the keyframing app to have it corrected and supervise the movement of the parts and pieces.
1. Adjusting Positions
If you attempt the hand-drawing pattern, you may modify the frame(s) by changing the object's position. You may do whatever works best for the picture and makes it more appealing in each frame.
2. Customizing Opacity
The opacity option allows you to make your photo much more clear and concise.
3. Scaling the Clip's Subject
The upgrades you work on to exhibit a wonderful message from your video increase the scope of excellence. As a result, keep an eye out for the frame's text, object, or topic being scaled down. You can resize the item as needed.
How to Use Keyframing in AceMovi Video Editor
Keyframing functionality in AceMovi Video Editor allows you to make your personalized animations. To animate a property, its value must vary over time. A keyframe can be used to indicate a value like a scale, spatial location, opacity, or rotation.
At least two keyframes must be specified to produce an animation. One keyframe represents the value at the start of the change, while the other represents the value at the conclusion. The steps for creating keyframes are as follows.
Steps on Adding and Editing Keyframes
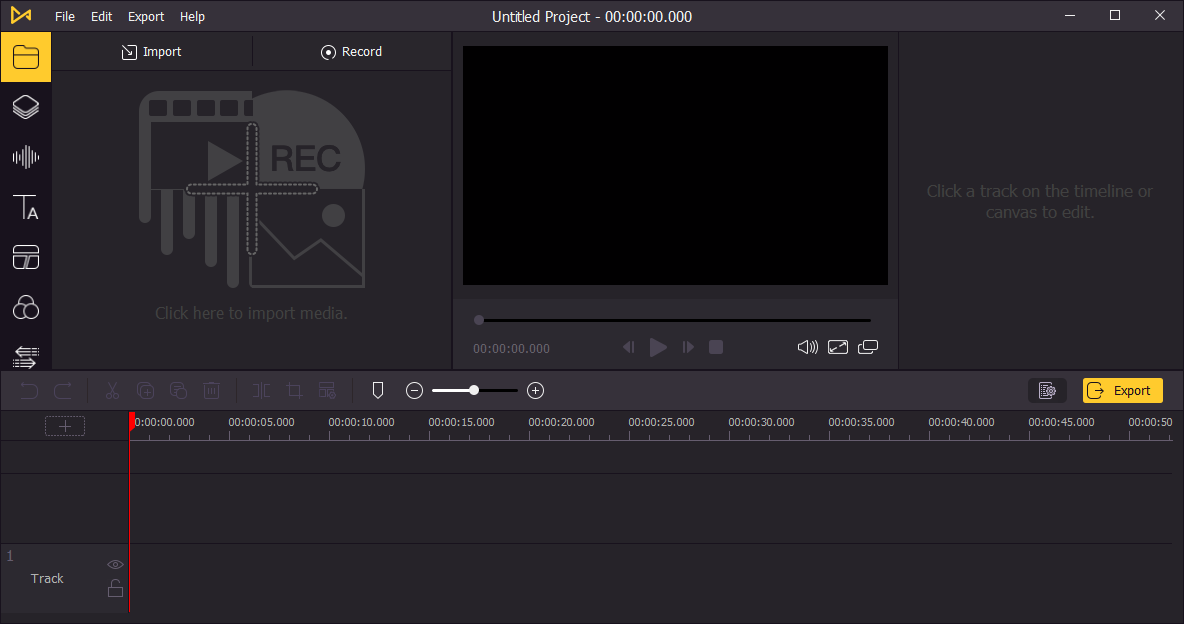
Step 1. In the Media Library, add a video clip, a picture, or a motion element.
Step 2. Then, on the timeline, drag your destination file.
Step 3. Move the play head to the location where you wish to add a keyframe by clicking on the video clip.
Step 4. Then, in the toolbar, select the Keyframing icon to create a keyframe for the start of the modification.
Step 5. Under the Animation tab, press the Properties icon to change the effect property's value, such as opacity, rotate, scale, and position.
Step 6. Then, drag the playhead to the second point, where you add a keyframe for the change's conclusion.
Step 7. And then, repeat the process to change the value and make your animations.
AceMovi also includes certain pre-programmed keyframes. Select the Motions option from the Animation menu on the left sidebar. Any keyframe you like can be dragged to the media file you wish to add. Then you may change the start and finish points to suit your needs.
Steps on Deleting Keyframes
You may quickly delete a keyframe from the timeline if you don't need it by following the below-mentioned steps.
Step 1. Select the exact keyframe by clicking on the clip that has applied the keyframe.
Step 2. Then tap the Erase icon in the toolbar or the Delete key on the keyboard to delete it.
Step 3. Repeat this procedure until you've removed all of the keyframes you don't require.
Conclusion
Keyframing enables you to elegantly move overlays, animations, and other settings over a set period of time. Using keyframes generates smooth, natural movement and eliminates the need for human effort when generating animations from the start.
You can also use keyframes to modify the length of time that effects display in your movie. Rather than applying an overlay to the entire clip, you may fade the effect in and out throughout the time you want it to appear.
Adding keyframes to your video is a simple approach to improve your footage without having to master complicated animation techniques. Now that you've learned the fundamentals of keyframing, you can utilize your imagination to implement it into various parts of your films.