
Having a perfect tool makes your video editing workflow more comfortable, especially when you are always sharing videos with your social media followers. Choosing the best video editor from the tons of options available on the Play Store is a dilemma in itself. And here let me introduce to you an open-source and free video editor Avidemux.
Making video edits a satisfactory experience, Avidemux features a set of basic functions for beginners. For example, you can make conversions between MP4 and other formats, sync audio and video, crop videos, rotate/flip video, etc. In this post, you’ll see the best review of Avidemux free video editor and how to make basic edits with it. Here it is!

- What Is Avidemux Used for (Pros & Cons)
- How to Begin with Avidemux (Best Alternative to Avidemux Included - TunesKit AceMovi)☜
- How to Trim Video on Avidemux
- How to Crop Video with Avidemux
- How to Rotate and Flip Video
- How to Sync Audio and Video in Avidemux
- How to Convert MKV to MP4 & The Formats Avidemux Supported
- Lastly
What Is Avidemux Used for (Pros & Cons)
Avidemux freeware video editor has been designed to make video editing completely manageable for beginners. The software is compatible with Microsoft Windows, Linux, and Mac OS and gives you all the basic video editing features including cut, filter, and encode.
Avidemux is an open-source video editing software so it has been designed to support a range of different file formats including Mp4, AVI, DVD, MPEG, WMV, 3GP, and more.
As a beginner in the video editing world, you can rely on Avidemux video editing software. Here is a complete review of this video editing software to help you learn how to edit videos with Avidemux.
- Free video editing software & No watermark exports
- Perfect for beginners
- Support all popular operating systems
- Users can add subtitles to their videos
- It can save custom-built scripts for future use
Pros:
- Complicated cutting features
- Outdated user interface
- Batch conversion option not available (Limited tracks)
- Lacks advanced effects like Split-Screen, Chroma Keying, PiP, etc.
Cons:
How to Begin with Avidemux
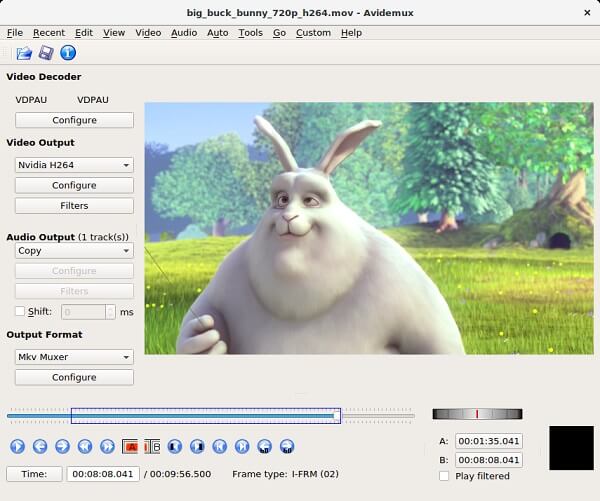
Avidemux has a clean interface but lacks upgrades. You can download Avidemux for free here. After downloading, you will only notice the forward-backward buttons at the bottom of the page along with a slider.
After importing the video into the app by File > Open, you have to unfold the editing menu for every single task. Let’s say you want to apply filters to your videos. You will have to go to the Filter menu, then click on it, apply it, and wait for the results. With no direct previewing option, editing videos becomes cumbersome and more time-consuming. Besides, the entire window-to-window interface looks completely outdated.
TunesKit AceMovi Video Editor - Best Alternative to Avidemux
So, if you want to check the preview effect in real-time and try more up-to-date video decoration features, I recommend you to try TunesKit AceMovi Video Editor. It is an upgraded and advanced-featured video editor.
With AceMovi, you just need to upload a video by simply drag-n-drop and applying all those amazing video editing features like filters, transitions, animations, and sound effects bunched up from the left side of the editor.
The timeline mode is yet another helpful tool that lets you have a fair idea about the outcome making things even more linear. So hit the following button to begin a totally new experience!
As we said, AceMovi comes with a plethora of advanced features like SlowMo, PiP, Chroma Keying, Reverse, Blur, Mosaic, Sound Equalizer, etc. For instance, if you want to make a popular slow-motion video and showcase it on your social group, you can easily make it with AceMovi via going to the toolbar > Speed > Slow > 0.5x - 0.01x.
How to Trim Video in Avidemux
To trim, cut, and split the video in Avidemux follow the steps given below. Firstly, go to the Open option at the top of the page to upload a video file.
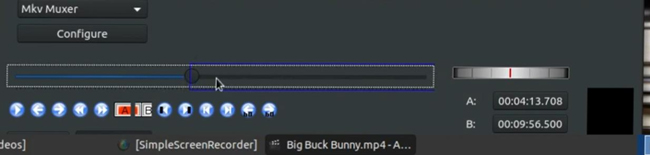
Secondly, move to the sliding bar at the bottom of the page. By sliding the slider you can forward or reverse the video. Move to the section of the video that you want as your starting point. Then click on the A button right below the sliding bar.
Lastly, move to the section of the video that will be your ending point. Now, click on the B button. Now, click on the Save option at the top of the page to save the trimmed video.
How to Crop Video with Avidemux

If you want to crop a video with Avidemux, you need to follow the menu of Video > Filters (Ctrl+Alt+F) > Transform. Now you’ll see the crop option, just go for it. Here you can resize the windows by setting an exact px number or dragging its edge purposefully.
How to Rotate and Flip a Video in Avidemux
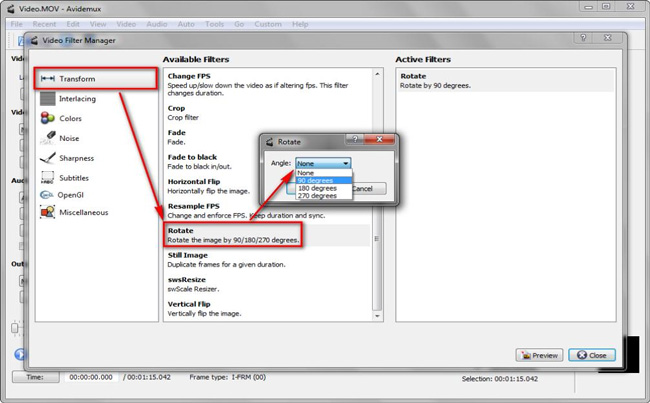
The same as the previous tutorial, if you are going to rotate or flip videos in Avidemux. You need to choose the video file and select the export format at the very beginning. Try to open the Video > Filters (Ctrl+Alt+F) > Transform > Rotate, Vertical Flip, and Horizontal Flip. You can only choose to set the degrees as 90, 180, or 270. You can click here to see how to rotate a video from 0 to 360 degrees.
How to Sync Audio and Video Avidemux

Try to sync audio and video in Avidemux video editor? Quite easy! You can directly find the audio output, Configure, Filters, and Shift on Avidemux’s interface. In case you find that the background surrounding is too crowded, just fill in lower Shifts like -100, -200, -300.
How to Convert MKV to MP4 & The Formats Avidemux Supported
How to Convert MKV to MP4 Using Avidemux
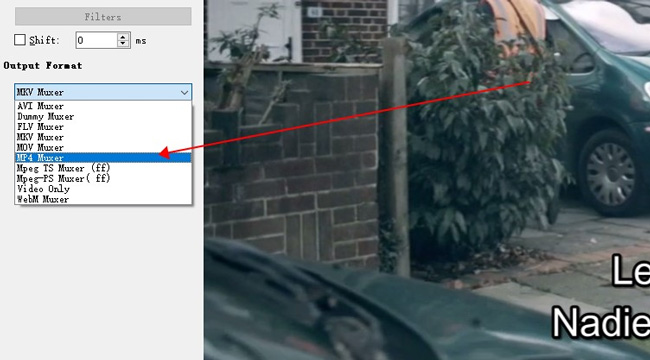
If you want to do video conversion, Avidemux can be a flexible option. For example, when it comes to how to convert MKV to MP4 using Avidemux, you need to go to the Output Format and choose the MP4 Muxer. Then go to File > Save.
How to Export Video
To save the video in Avidemux go to the Format panel and select the desired format from the drop-down list. Next click on File> Save> Save File. But you can also adjust video quality, the output path, resolution, and codec before exporting the video.
Audio Formats Supported
Avidemux supports some of the popular audio file formats including AAC, AC-3, DTS, Mp3, Mp2, Opus, PCM, Vorbis, TrueHD.
Video Formats Supported
Avidemux video editor supports limited formats including Mp4, MKV, OGM, AVI, MOV, WMA, ASF, TS, VOB, WebM, etc.
Alternative - A More Professional Video Converter for Windows 10 & Mac
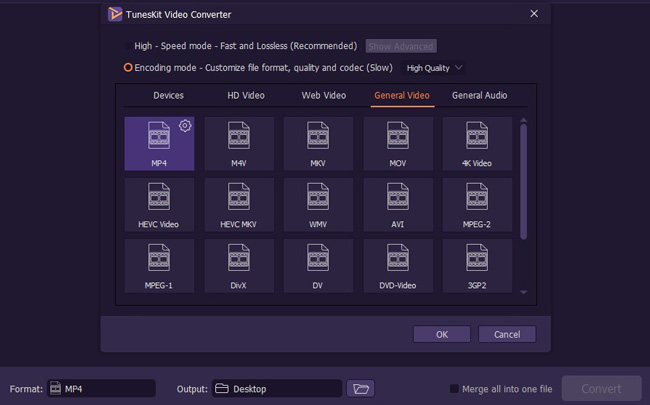
Provided you want to convert other formats like DivX, DV, DVD-Video, 3GP-2. 4K Video, TunesKit Video Converter must be one of the best options with which not only can you make video conversion quickly but also you can set the parameters of the sound quality, resolution, and codec.
Conclusion
We have to say that Avidemux is a bit out-of-date, especially it’s unfit for any condition of editing and rendering multiple videos. You can wait for its upgrading or try the best alternative video editor AceMovi introduced.